Yay! The Back-To-School Fairy stopped by Room 204!
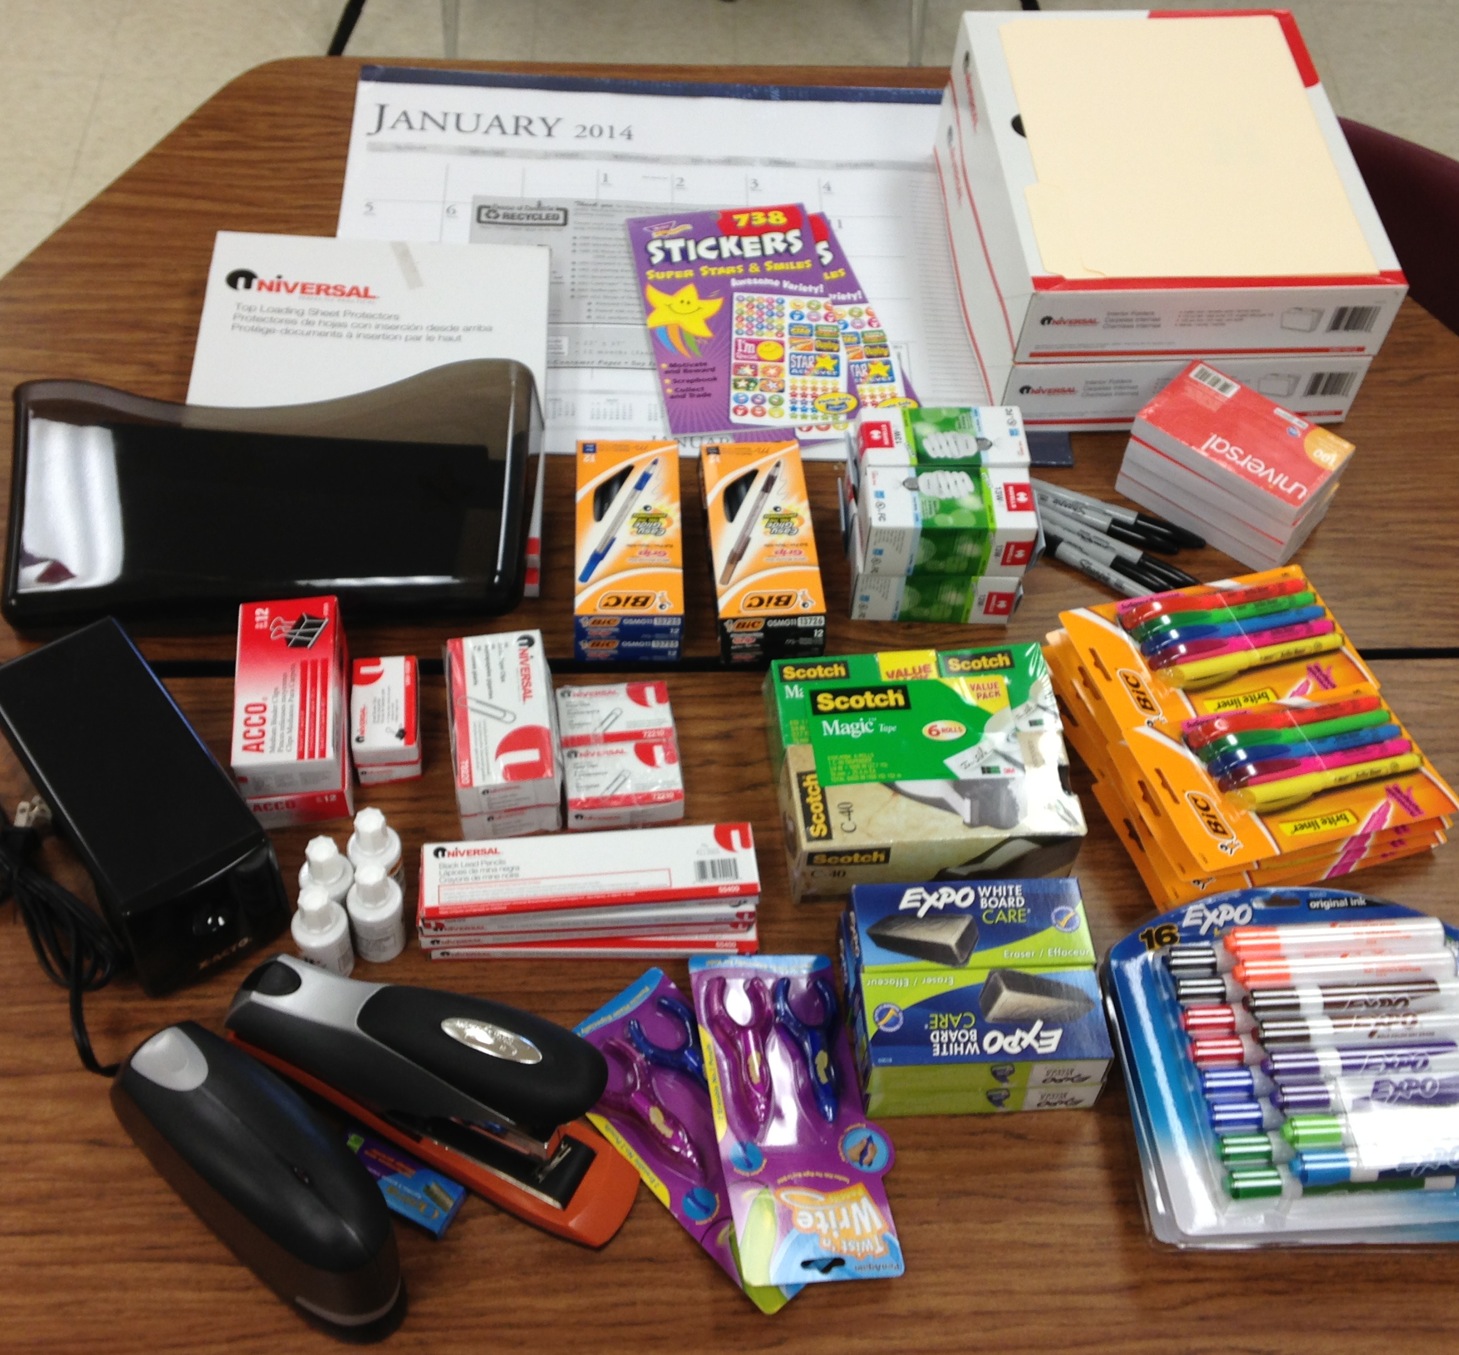
I’m very excited about a few things I ordered in the spring. Back to School shopping is such an exhilarating activity – it’s something I’ve loved to do ever since elementary school. Ahhhh…. the smell of new supplies! It’s better than roses!
What I ordered:
Desk Calendar
Page Protectors
Manilla Folders – one for each student
Stickers (yes, even 8th graders love stickers)
Black Pens
Blue Pens
Lightbulbs (I have several lamps in my room for when we are using the SMARTBoard and the room lights are off)
Highlighters
Sharpies
Index cards
Invisible Tape + Dispenser
EXPO Markers for my whiteboards
Whiteboard erasers
Twist-n-Write Pen/Pencil – have you ever tried these? They are fantastic!
Pencils
Paper Clips
Binder Clips
Whiteout
An ELECTRIC Stapler! I squeal with excitement!
An ELECTRIC Pencil Sharpener! Be still my heart!
Another crazy super-powered stapler that can do 30 sheets at a time (P.S. WHY do my students always manage to break these? I buy 2 new ones every year!)
A Magnetic File holder (This is where I have students turn in their work)
I have a few things yet that I will be purchasing with my own money:
Candy (incentives). Since I must be mindful of nut and dairy allergies, I usually get Smarties, Dum-dums, Jolly Ranchers, Peppermints, etc. Even those aren’t safe from allergies, however. I had a student who was allergic to food coloring 🙁
Granola bars and snacks for the students who forgot breakfast/lunch.
A silver Sharpie so I can try out this new idea I saw on Pinterest for a Reading Graffiti Wall. Expect a detailed post once I have finished it!
Some fashion duct tape so I can make flags on my pencils. They always walk off!
I’m curious to see how much of these supplies I actually use this year, given that we are going one-to-one with iPads. I know there will still be a significant amount of handwriting, and we aren’t going completely paperless yet. I imagine my supply list will dwindle each year as we get used to relying more on our electronics.
Do you think there is anything I missed? Do you have some Back-To-School items that you always purchase?
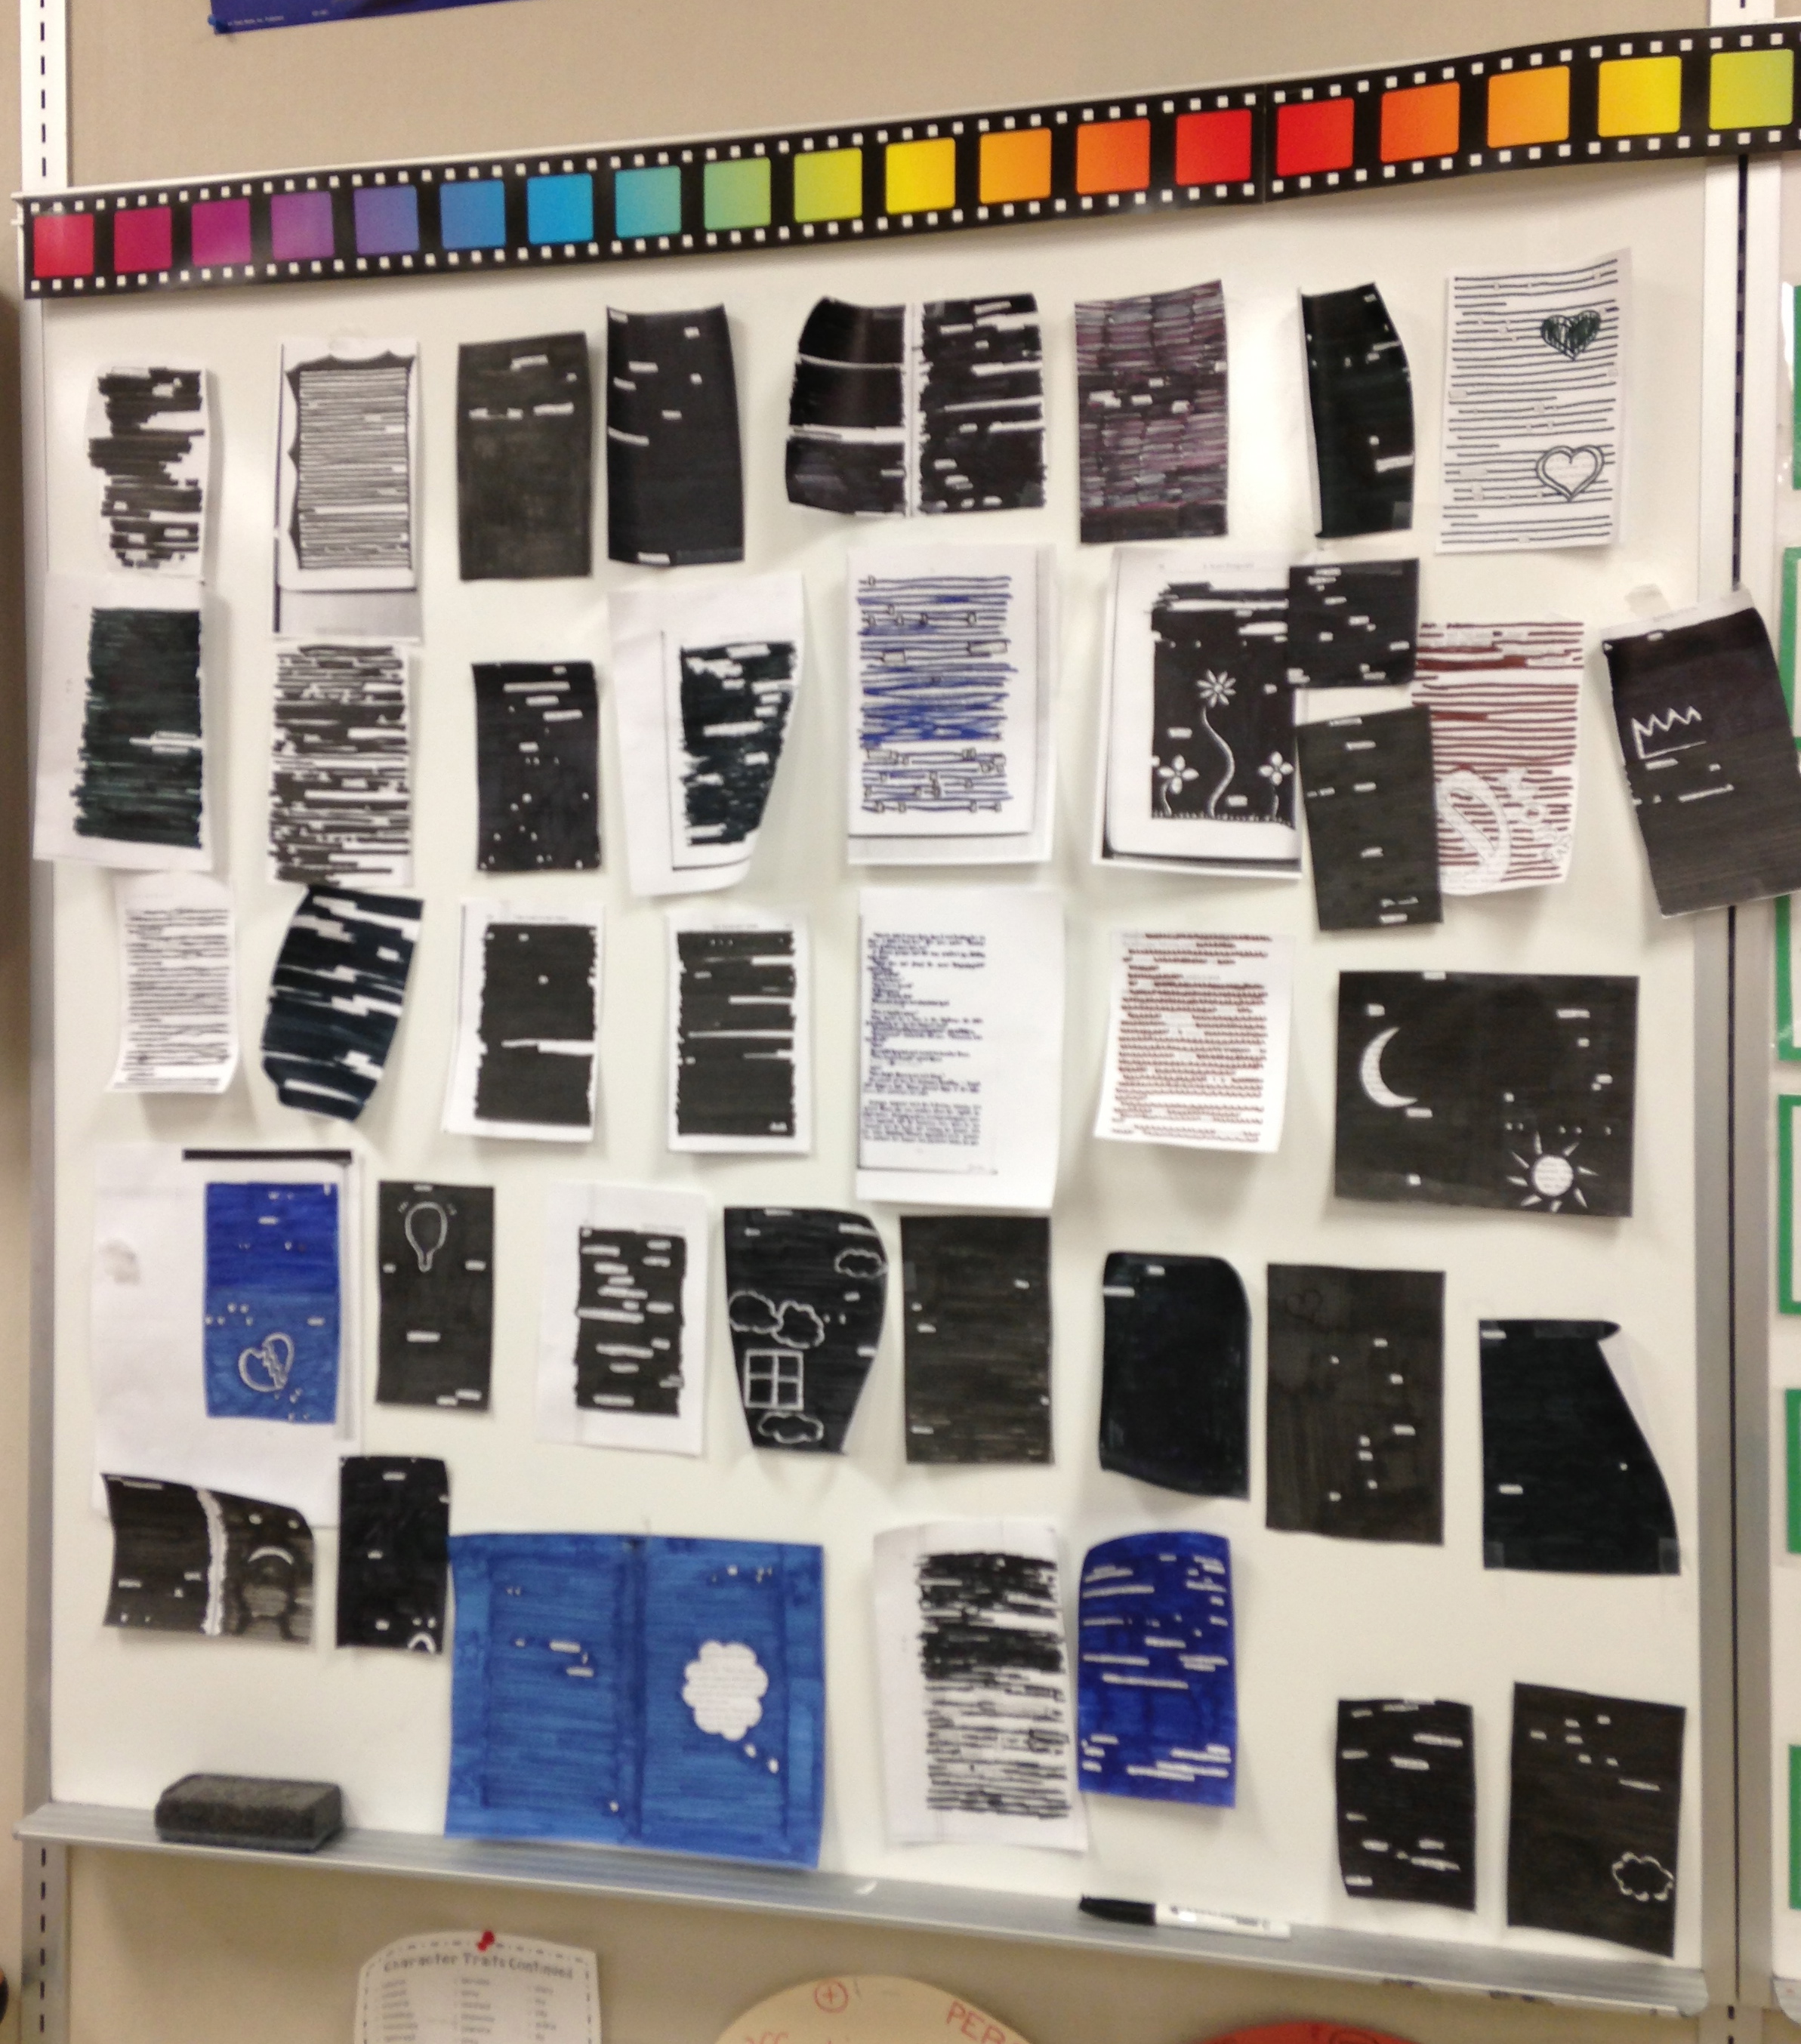
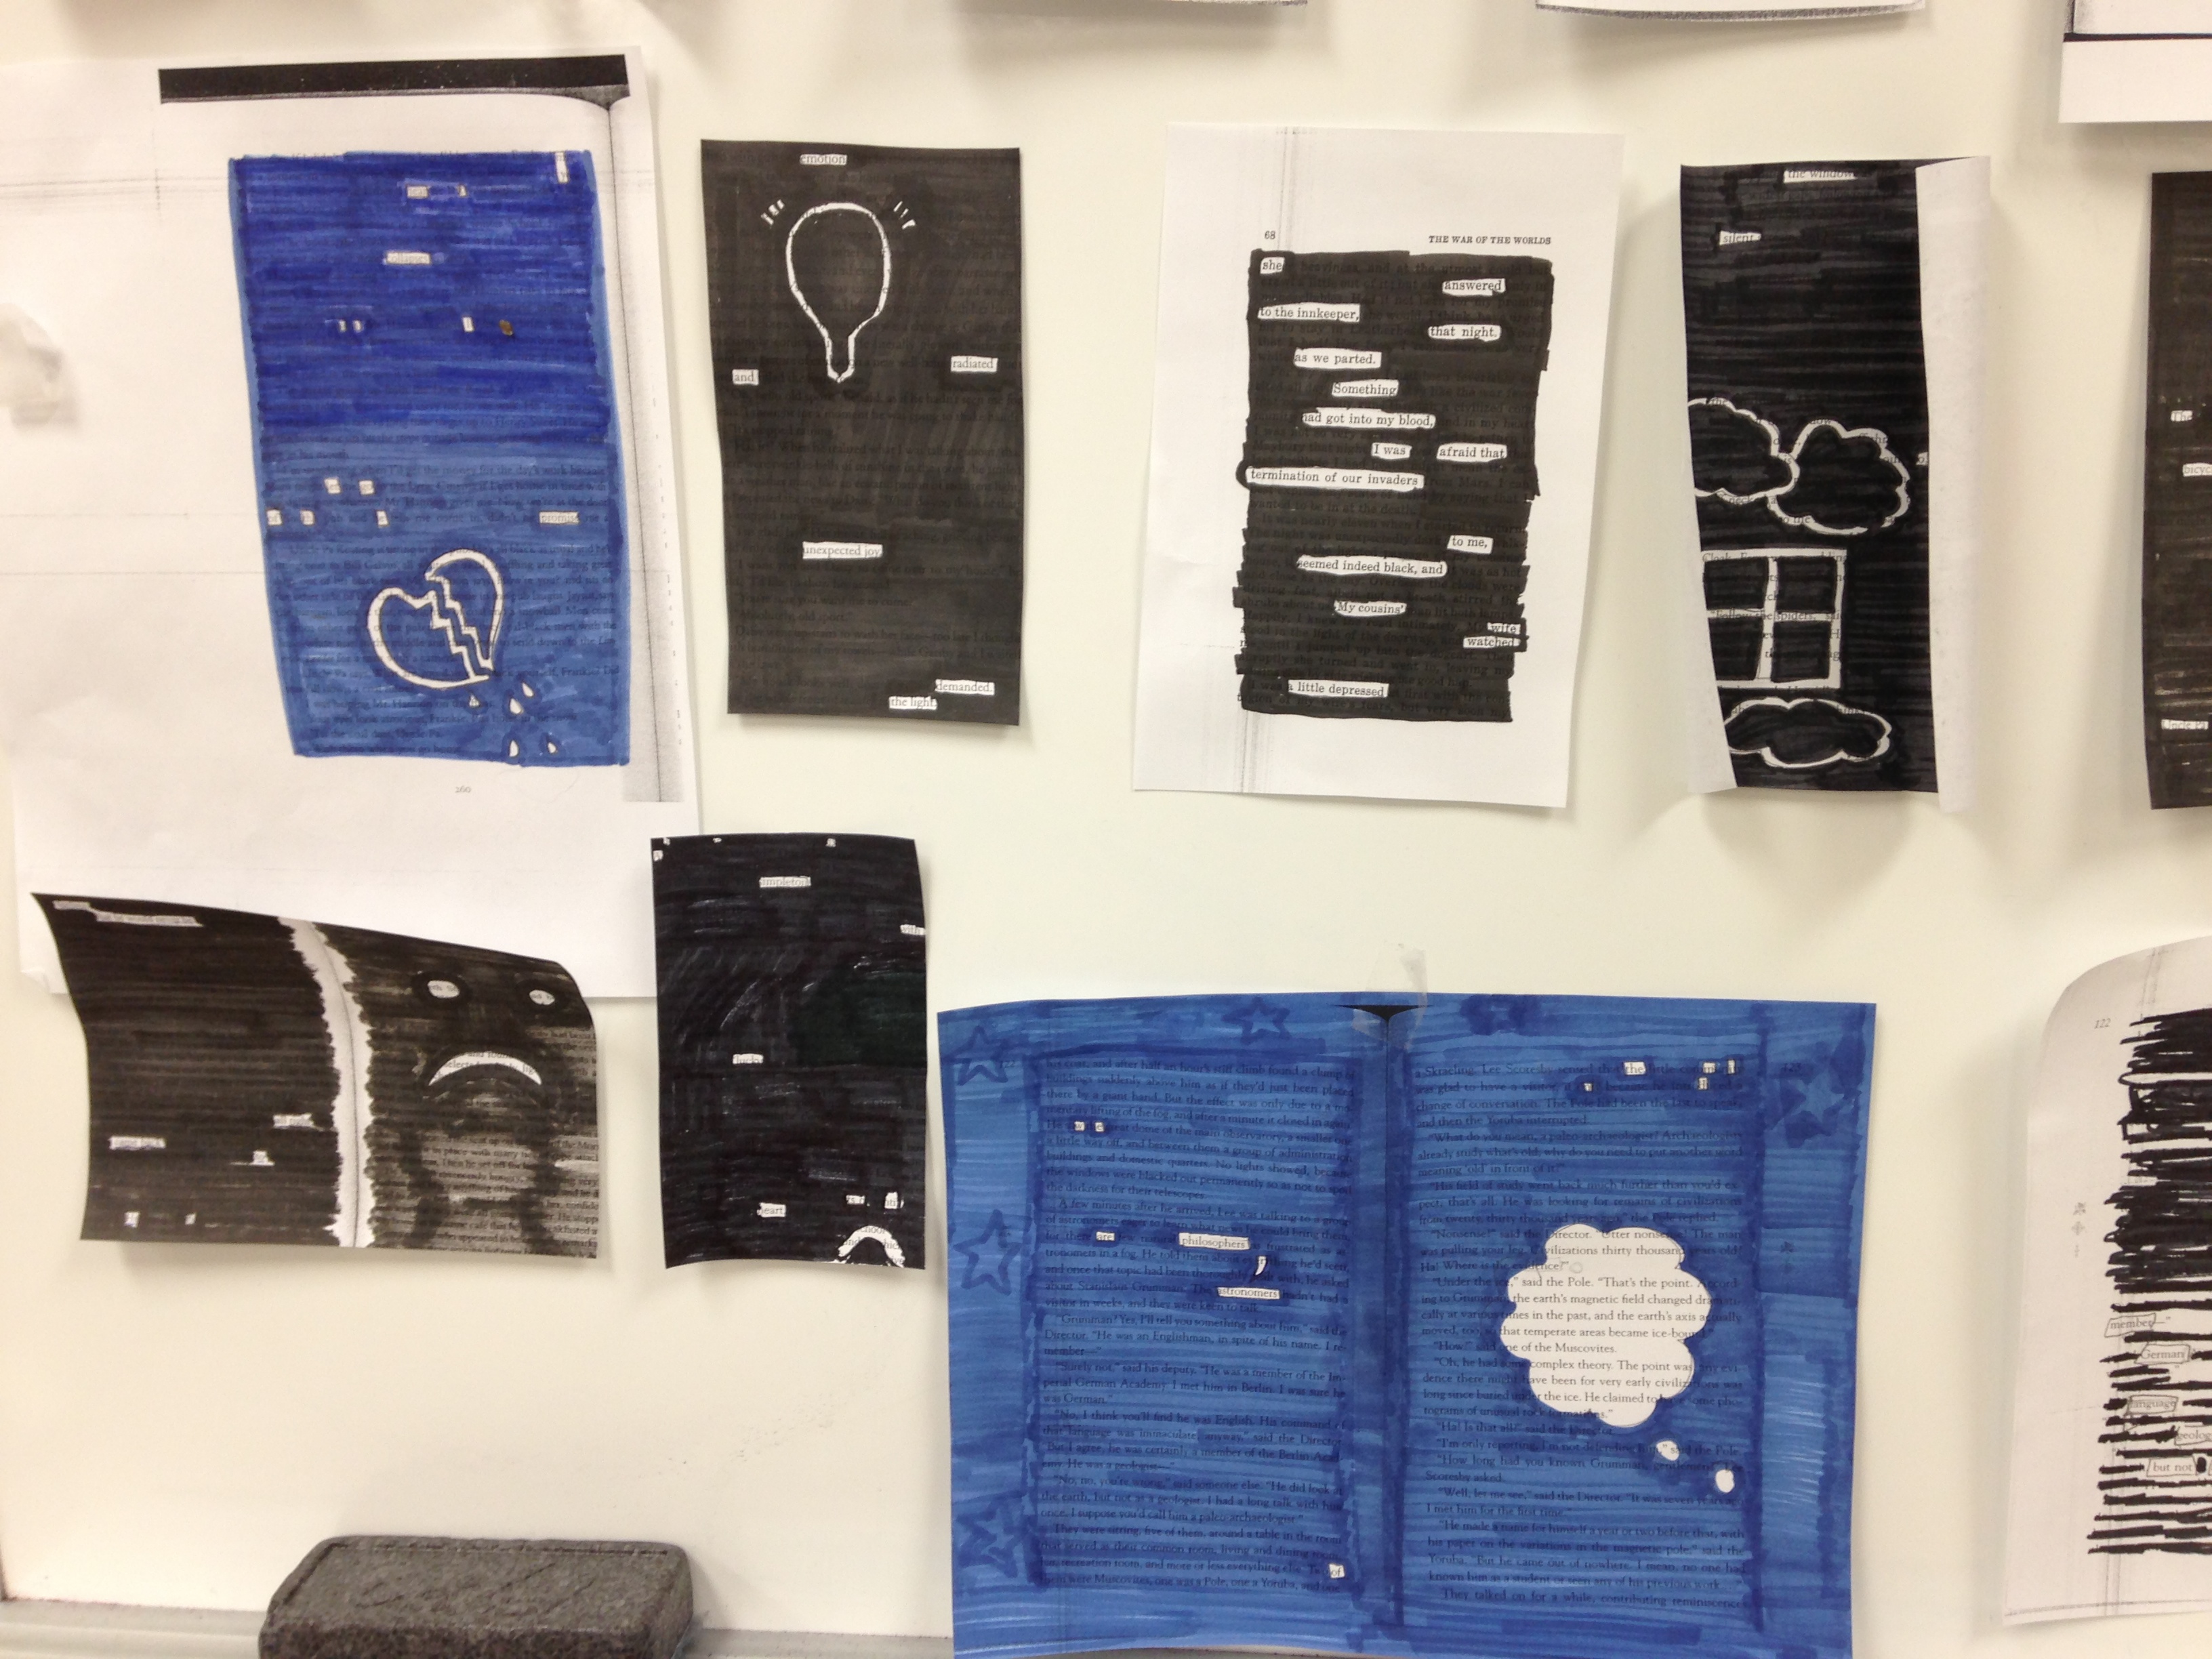
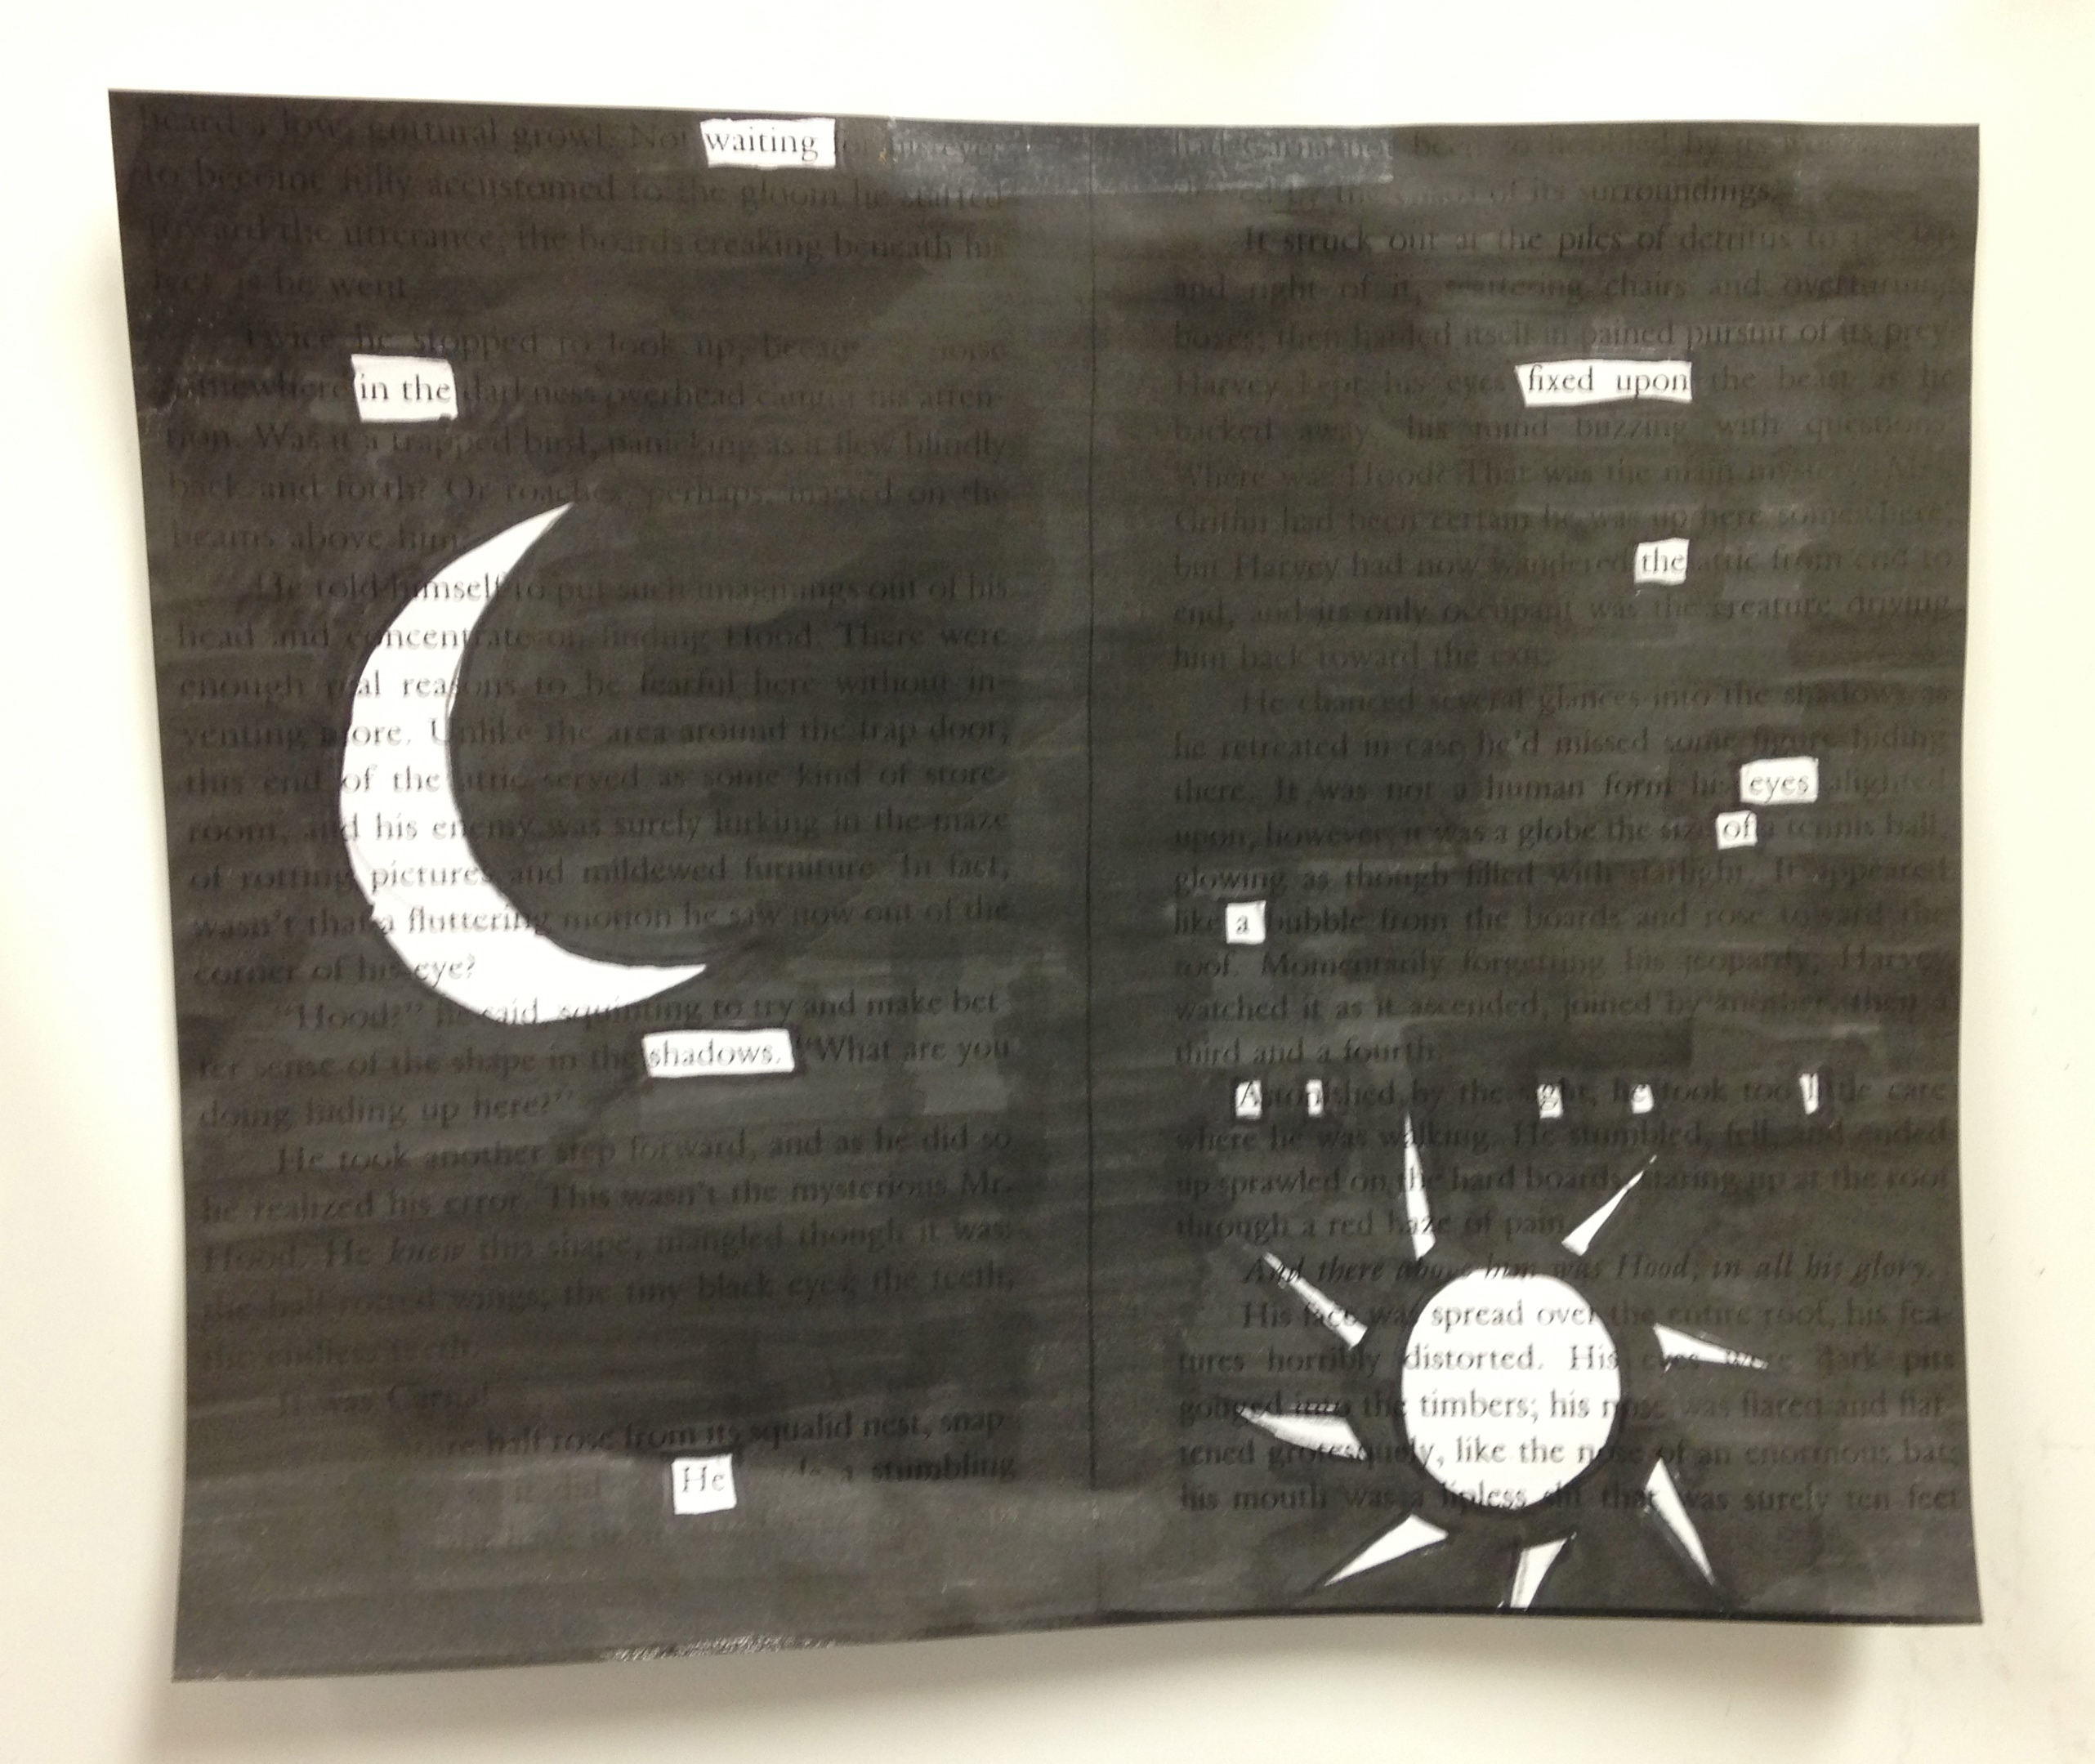
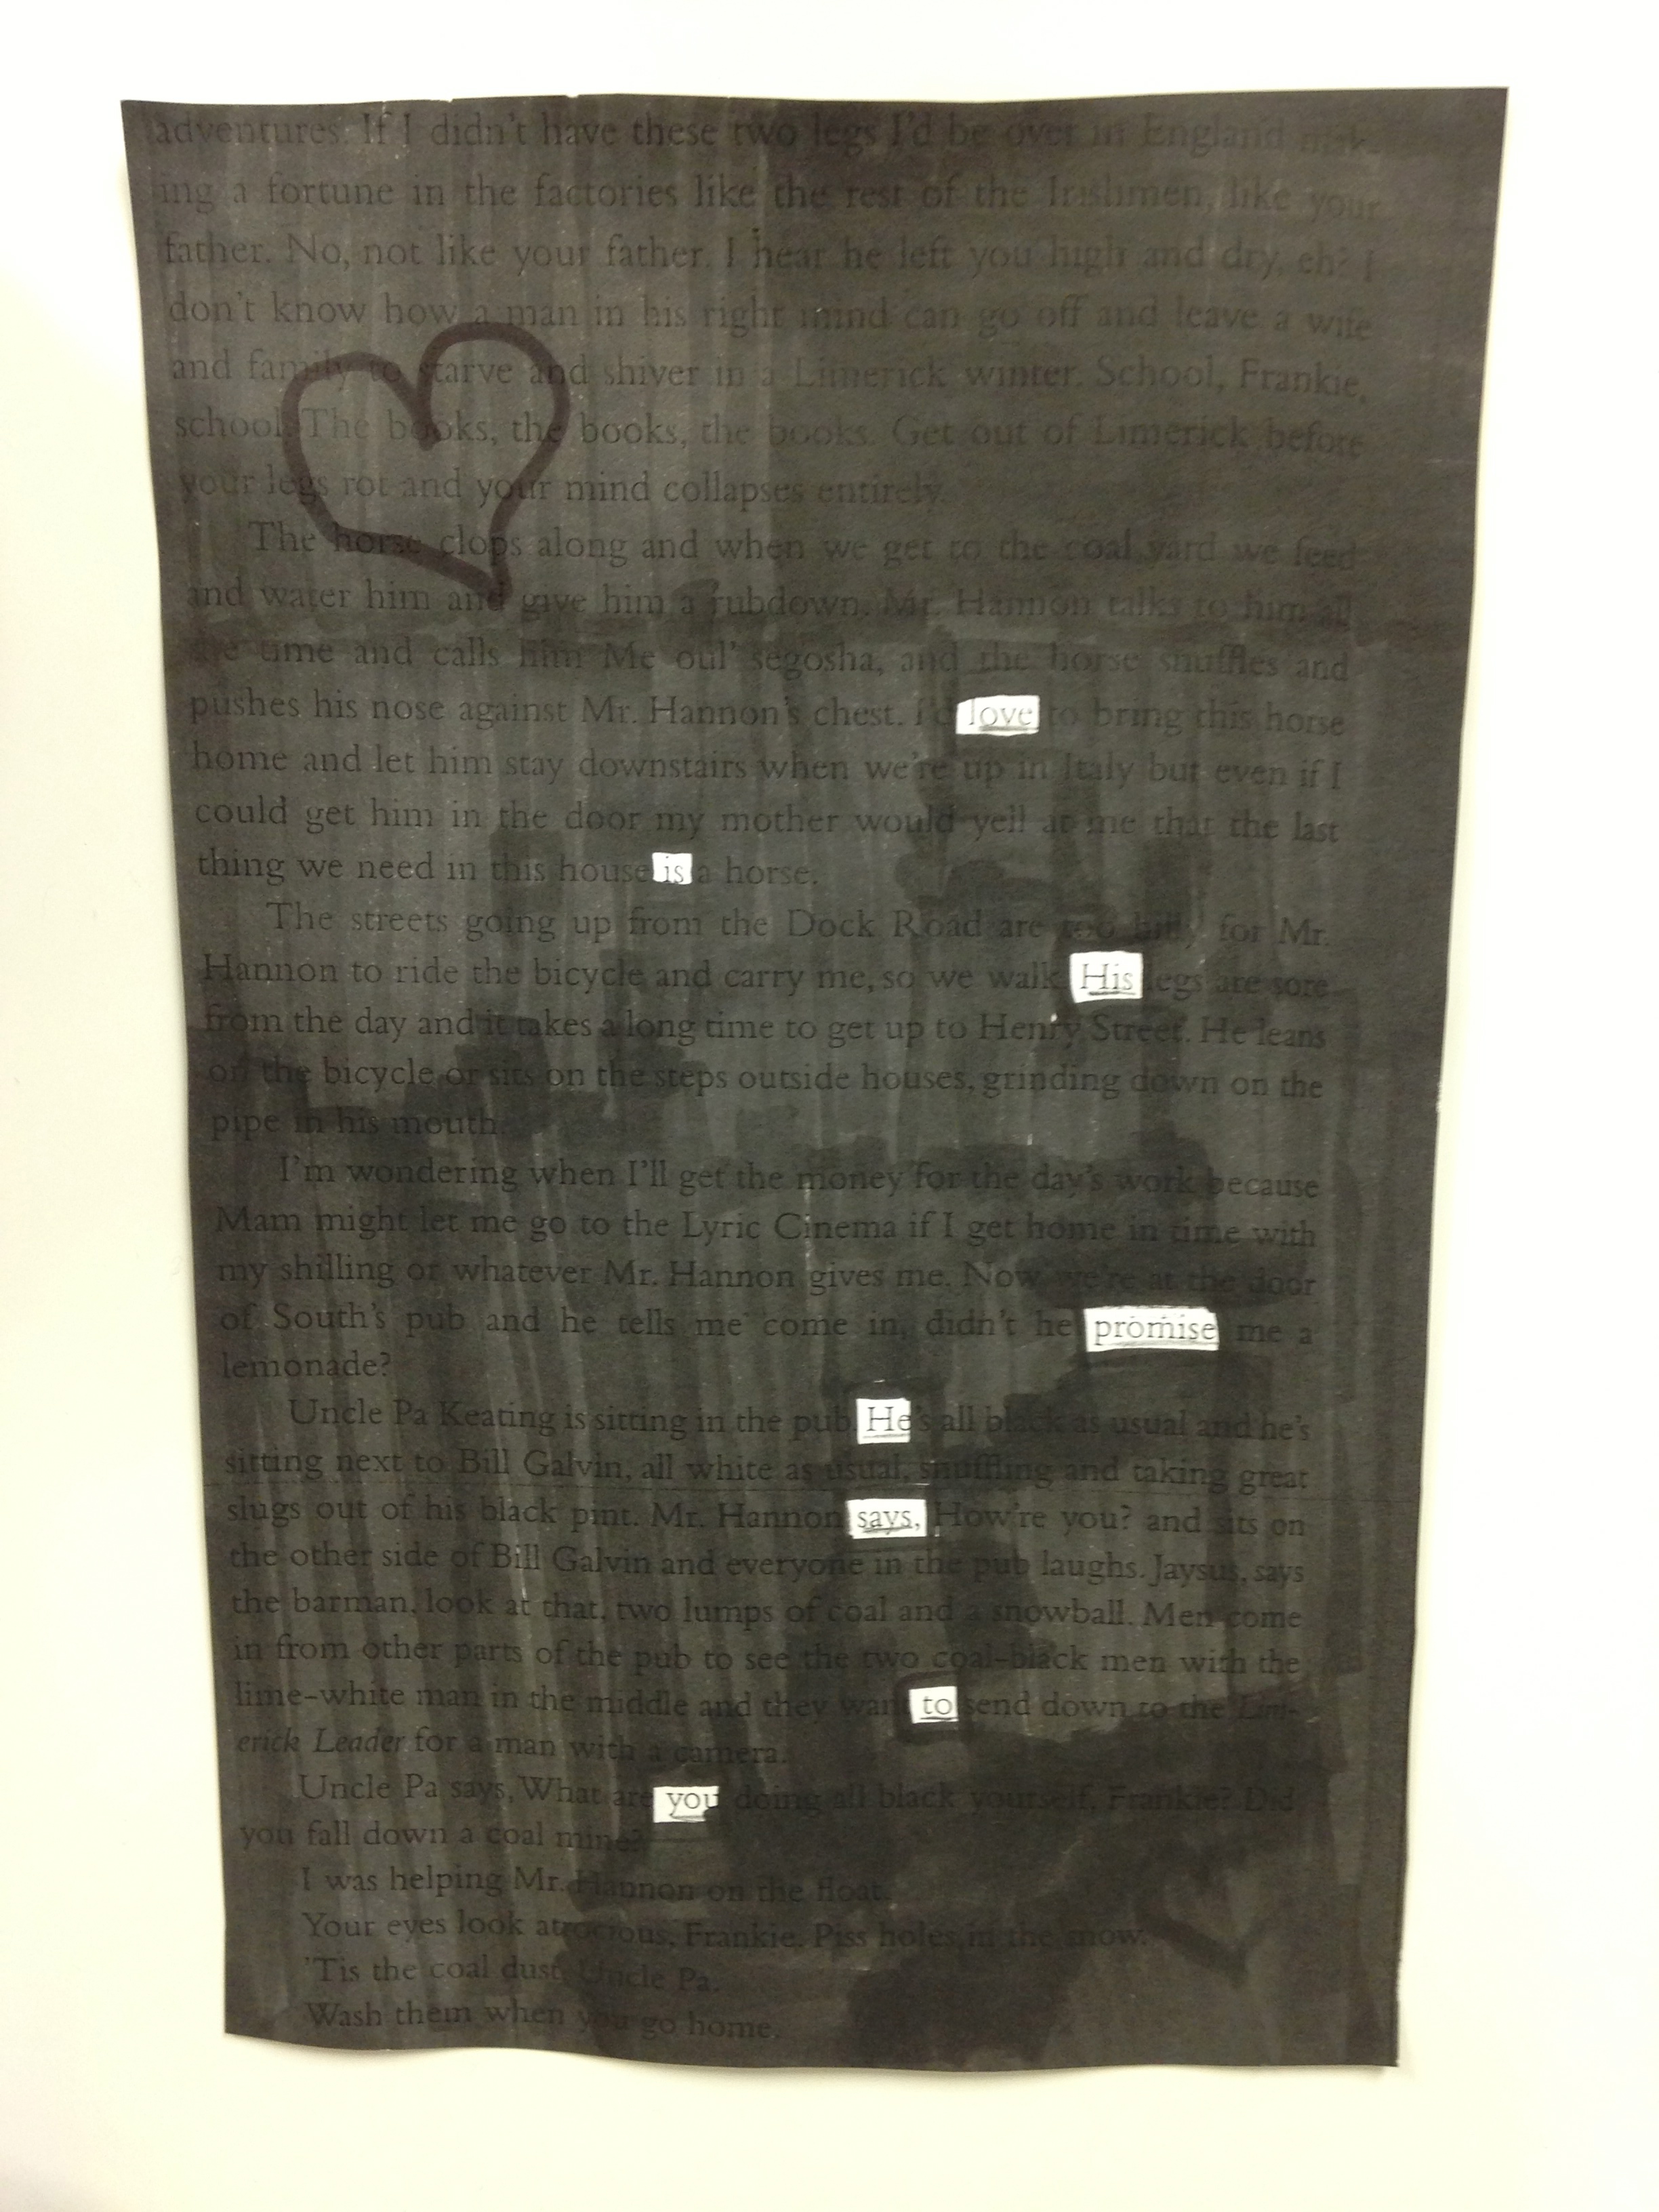
Have you heard of Blackout Poetry? This is a really simple, effective, fun way to introduce poetry. EVERYone can do this. As I tell my students, you don’t have to create something from scratch – the something is already there. It’s up to you to liberate the poetry from page – find the secret message and reveal it.
Laura Randazzo, one of my favorite sellers on TpT, created a FREE Blackout Poetry product that my students have classroom tested and approved. We began by watching the free Prezi that she created. If you aren’t familiar with Prezi (nickname for Presentation), it’s basically like an online Powerpoint, but way more fun. You don’t need any special equipment – just Internet access. This Prezi walks you through the process of creating Blackout Poetry.
Teacher Tip: I warned them the day before our lesson to bring dark markers to class (and I rustled up as many as I could find in my teacher stash as well) as well as scissors (in case they wanted to trim their poem).
To prepare for this lesson, I chose several dozen of my favorite classroom novels. I hauled my pile to the copy room, opened each book up to a random page, and copied it. That way, we aren’t destroying any books. Since my students sit in groups in my classroom, I placed a pile of copied pages at each table group and asked them to pick a page that ‘spoke to them.’ Warning: advise your students NOT to read the page. This will put an unshakable idea into their head about what the page should be about. BIG mistake! It’s best to just skim the words, like scanning the food in your refrigerator, for a basic idea of what you want. There was a lot of discussion and paper-passing, but my students settled on their final decisions within a few minutes.
After we watched the Prezi, I asked my students to start with a pencil and look for a special word (anchor word) from which they could build a message. “But Mrs. D., what should the message be about?” Great question. I asked them to think about themes we have learned through our novels and short stories throughout the year. Think about universal messages about life, truths, or observations about humanity. That seemed to be a great place to start for the vast majority of my students. The more advanced poets didn’t need as much direction and just dug right in.
Once they had a potential poem sketched out in pencil, I directed them to try out their poem on a classmate. Ask for a reaction and feedback. Make any necessary revisions, then finally go for the marker and start blacking out what isn’t needed.
As an extension for some students, I invited them to insert a blackout image that complimented the poem. As you can see in the sample images below, the students rose to the challenge!
The beautiful results were then displayed for the remainder of the poetry unit 🙂
A real challenge in middle school is getting an increasingly large group of apathetic students excited about reading. I don’t mean to say ALL of my students – I definitely have some voracious readers – but there is always a hefty, vocal group that seems proud to proclaim indignantly, “I don’t read.” Well, harumpf. What’s a teacher to do with that kind of attitude? I understand that as an English Language Arts teacher, it is my job to get students excited about reading. Confetti, cartwheels, iPhone giveaways – whatever it takes! Okay not really. I’m not a performer, I’m not rich, and I don’t work miracles. I do my best to give students authentic, fun, motivating reasons to pick up a book (aaaaaand actually read/finish it). Of course I have to give a nod to my favorite teacher-author, Kelly Gallagher, who writes about just this topic in his book Reading Reasons. If you haven’t read it, I highly recommend it!
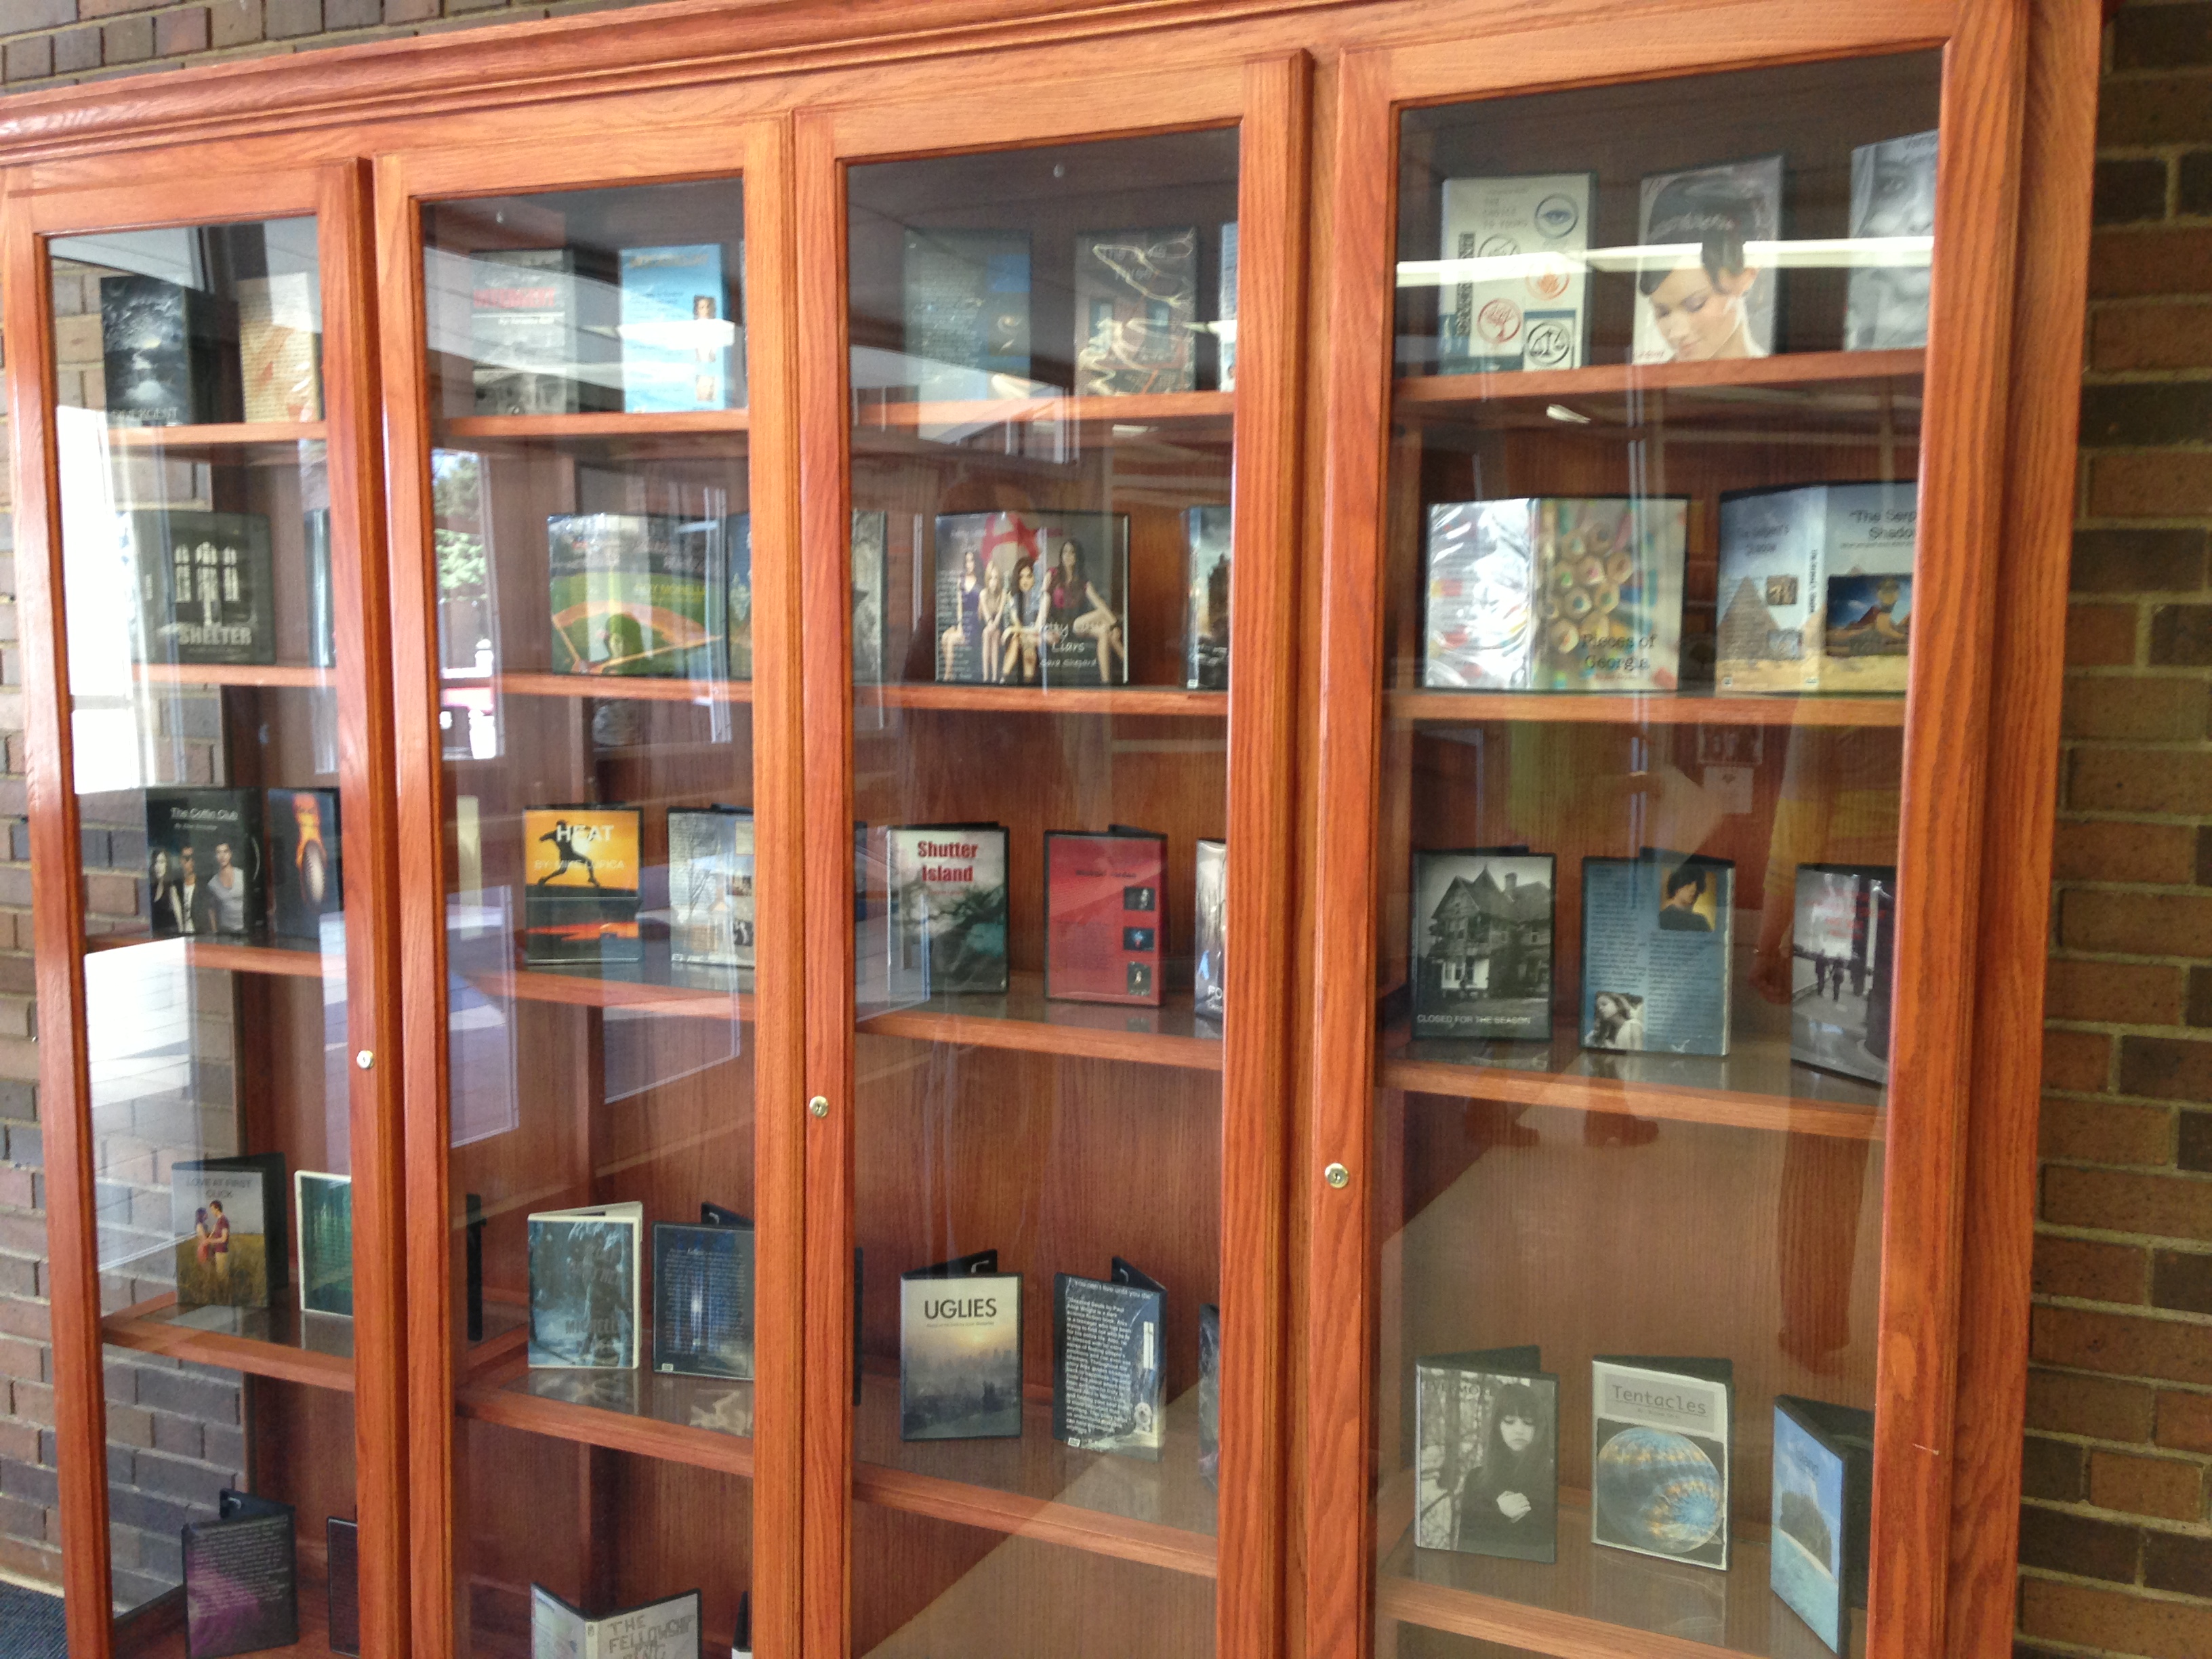
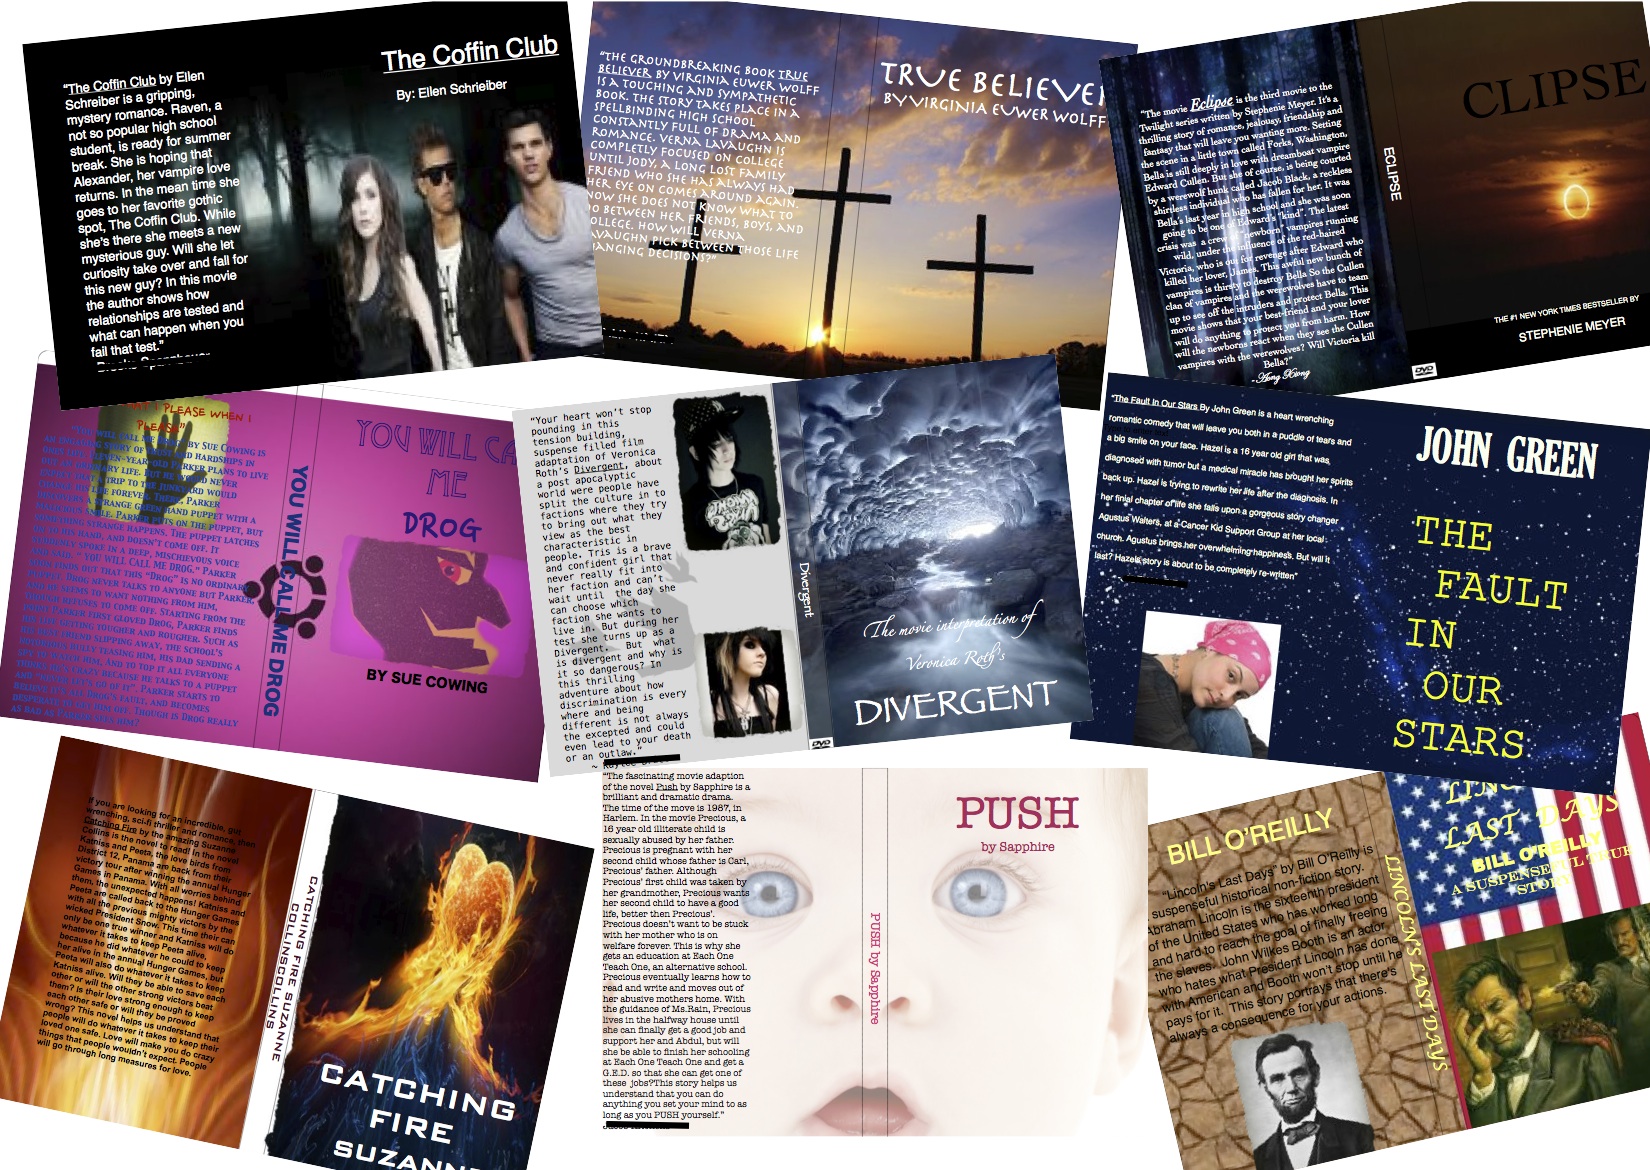
One of the ways I try to motivate students to read is through my DVD Case / Movie Poster project. It is a project with reading, writing, language, expression, and art – a great way to hit multiple Common Core standards at once. This project has lots of elements that get kids excited: technology, critical thinking, creative writing, photography/images, and the critical elements of publication and display. Here is a glimpse of the final project, which is explained in more detail below:
You are looking at the display cases in the front lobby of our middle school. Each and every student got a chance to have their final DVD case (or movie poster) on display for the entire school. In addition, my students got some one-on-one time with 6th and 7th graders to share their project. They read their summary and review quotes on the back, explained the layout and image choices, and answered any questions their audience had – all in hopes of inspiring the student to go and read the book for themselves.
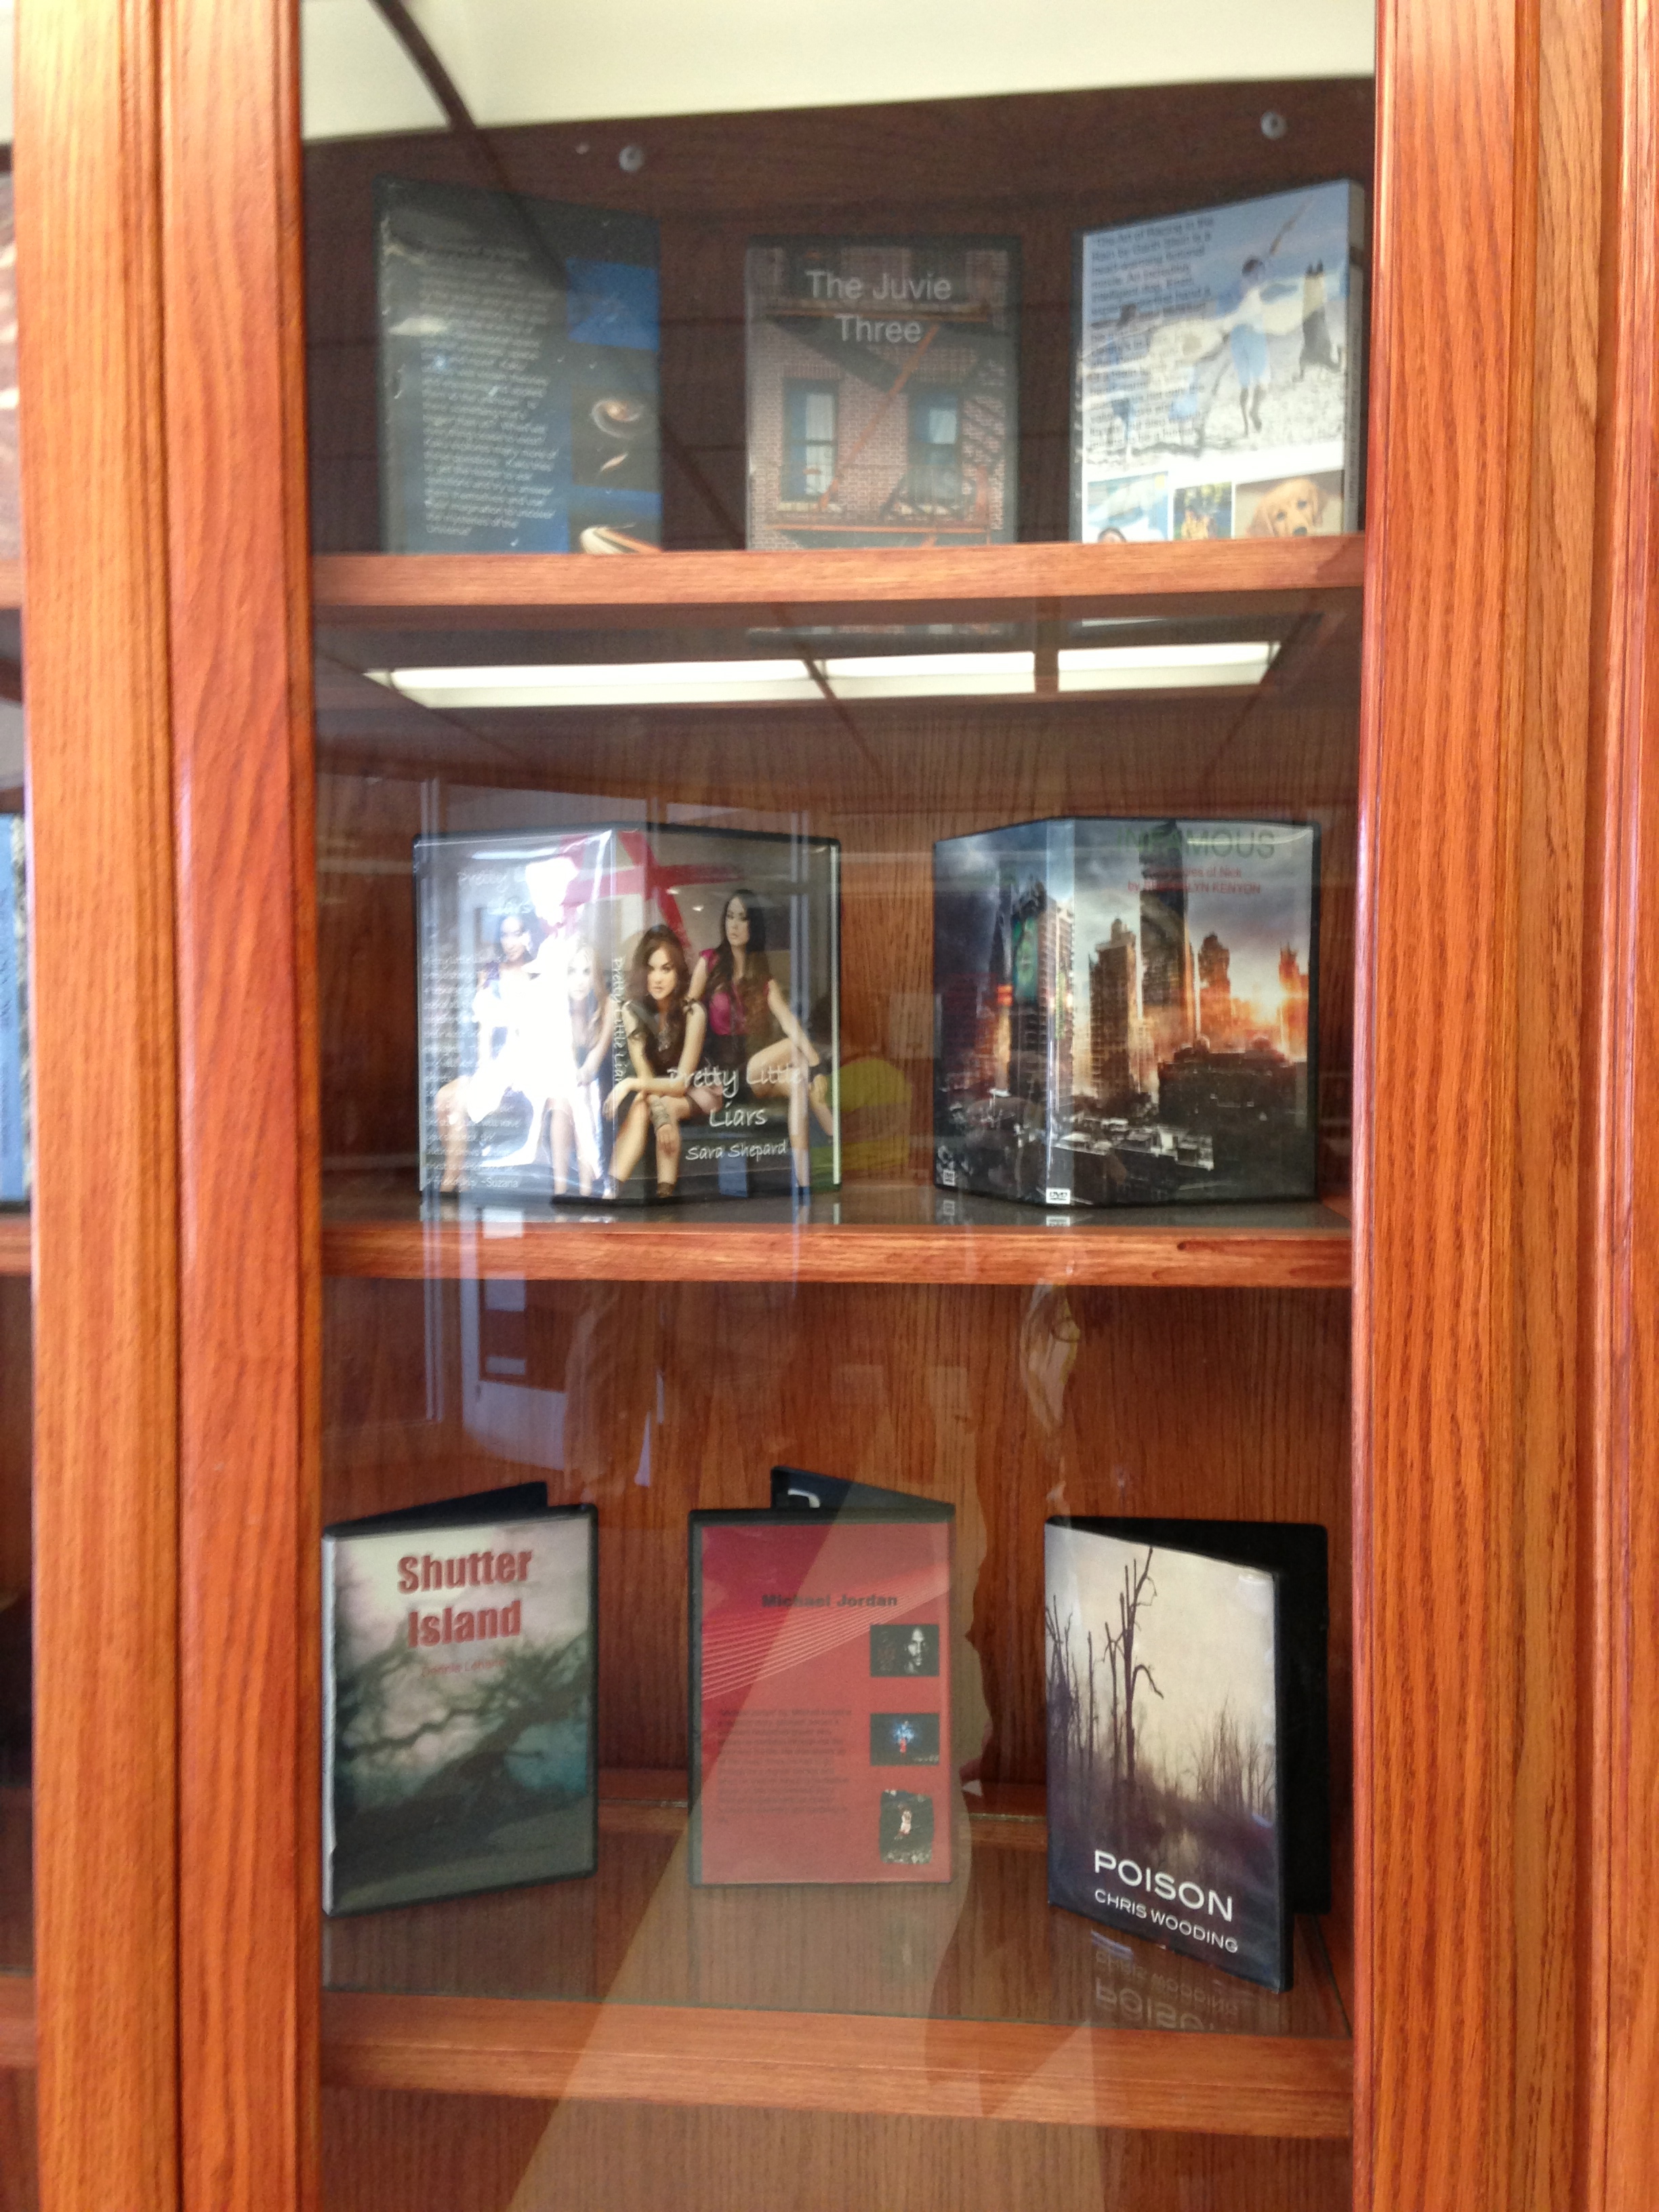
Here is a closer look at a DVD project:
And a collage of my students’ work:
Students begin by selecting an interesting book (can either be a novel or a biography) that is at their appropriate reading level. I introduce this project about 6-8 weeks ahead of time to get students enough warning to finish the book.
After reading the book, students will write what I call a ‘Review Quote’ (a book teaser summary that discusses the theme/message) to promote the book. To do this, we look at the backs of many books, even visit http://www.rottentomatoes.com and http://www.rogerebert.com/reviews to get a feel for the rich language of a teaser/review.
Next, the students will create either a DVD Case or a Movie Poster to promote the book through images as well as words. They really love this part, and I’m not just saying that. Rarely do I hit the money with a project where every single student is working, but this is it. And everyone is working at his/her own pace and area of expertise – artists, techies, writers; they all find their niche and even help one another.
On the day where I introduce the project, I bring in dozens of DVD covers and movie posters for students to view. We discuss similarities and conventions such as the size of the font, placement, purpose of images, etc.
After introducing the project, I wind up giving students 3-4 more days of in-class work time. Now that students have their own iPads, I may cut down this time and expect them to do more homework. On the 5th day, we do the printing and final touches, such as laminating the movie posters or putting the DVD covers in to the cases (I bought 100 from Amazon for about 25 cents each, totally worth it!). The 6th day is for presentations.
I am excited to do this project with the iPads this year, because students can actually go out and take their own photographs. Their goal is to match the mood of the book through color, layout, font, and images. They really do quite a bit of critical thinking with this project.
One of the only problems I have run into is that if their book has already been made into a movie, some students rely very heavily on the movie images. I had to make a rule outlawing this. The results were great, as this ultimately pushed students to be original and dig deeper into their own interpretation of the book.
Something that I learned last year, and will be repeating this year, is that some students like to make their own movie poster / DVD case from scratch, and others need a template to get started. Here is a template I created in Pages for the DVD Case. Students can ‘drag and drop’ their own images:
The final product can be displayed in your classroom, hallway displays, or as part of a gallery in which you promote the books to other students. The Library Media instructor at our school asked if she could display them in our Library, too!
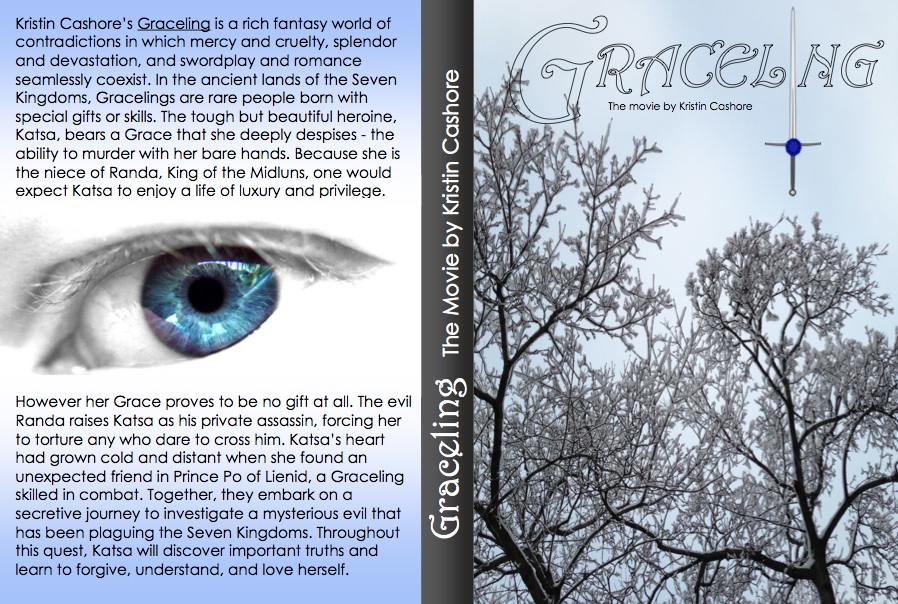
If you want to purchase and download my DVD case / Movie Poster unit from TpT, the following items are included: * Common Core Standards for grades 8-12 including English Language Arts and Literacy in All Subjects * Suggestions for modifying and differentiating this lesson for students at all levels, from heavy support needed to extension ideas. * Essential Questions * Rubric * Project Description Student Handout * Sample Writing ‘Review Quotes’ with “Hatchet” by Gary Paulsen and “The Giver” by Lois Lowry * 2 Sample DVD Cases with “Peak” by Roland Smith, and “Graceling” by Kristin Cashore * 1 Sample Movie Poster * Word Spectrum – ‘interesting’ to ‘boring’ – 65 synonyms students can incorporate into their writing * 5 Pages of detailed lesson plans and teacher tips including guided writing, peer review, modeling, small and whole group discussion.
I loved teaching this unit and collaborating with our school’s Art and 21st Century teachers. We found that this unit hits on a LOT of Common Core Standards and curricular goals, which was a huge plus! By working together, we strengthened student learning and participation. Students have told me that this was their favorite project all year!
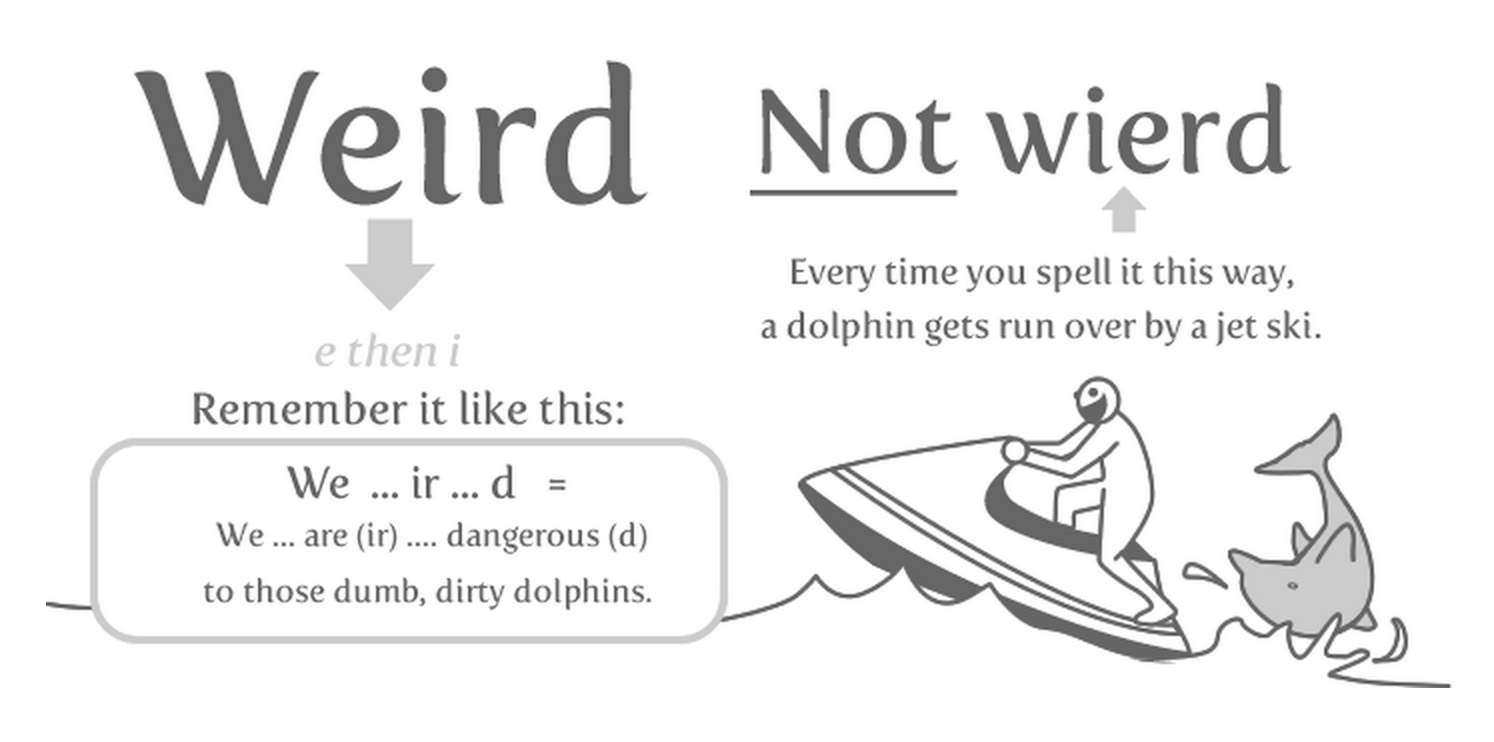
So are you a fan of The Oatmeal? No, not oatmeal that you eat, but THE Oatmeal? He’s my favorite web comic. I own his book, which he autographed! What can I say, he just speaks to me. He’s ridiculous!
It’s true – people DO need to stop misspelling these words. It’s pretty very annoying.
Here’s a sample:
I know my 8th graders would find this absolutely stinking hilarious.
You can purchase the poster for $20, which he says is perfect for the classroom. So here’s my question: Would you post this in an 8th grade classroom?
There is a reference to alcohol, an alien that keeps ‘crapping,’ the word ‘crap,’ referring to misspellers as ‘a-hole,’ and hemorrhoids (but that’s just funny, right?). I mean, good common sense says NO. Maybe this would pass as appropriate in a high school classroom, but 8th grade is just skirting the line?
I wonder if he would ever consider making a few revisions for our younger adolescents. I could see this having a really big impact on my students who would identify with the humor and forget that they were supposed to be learning something. This kind of humor is right up their alley.
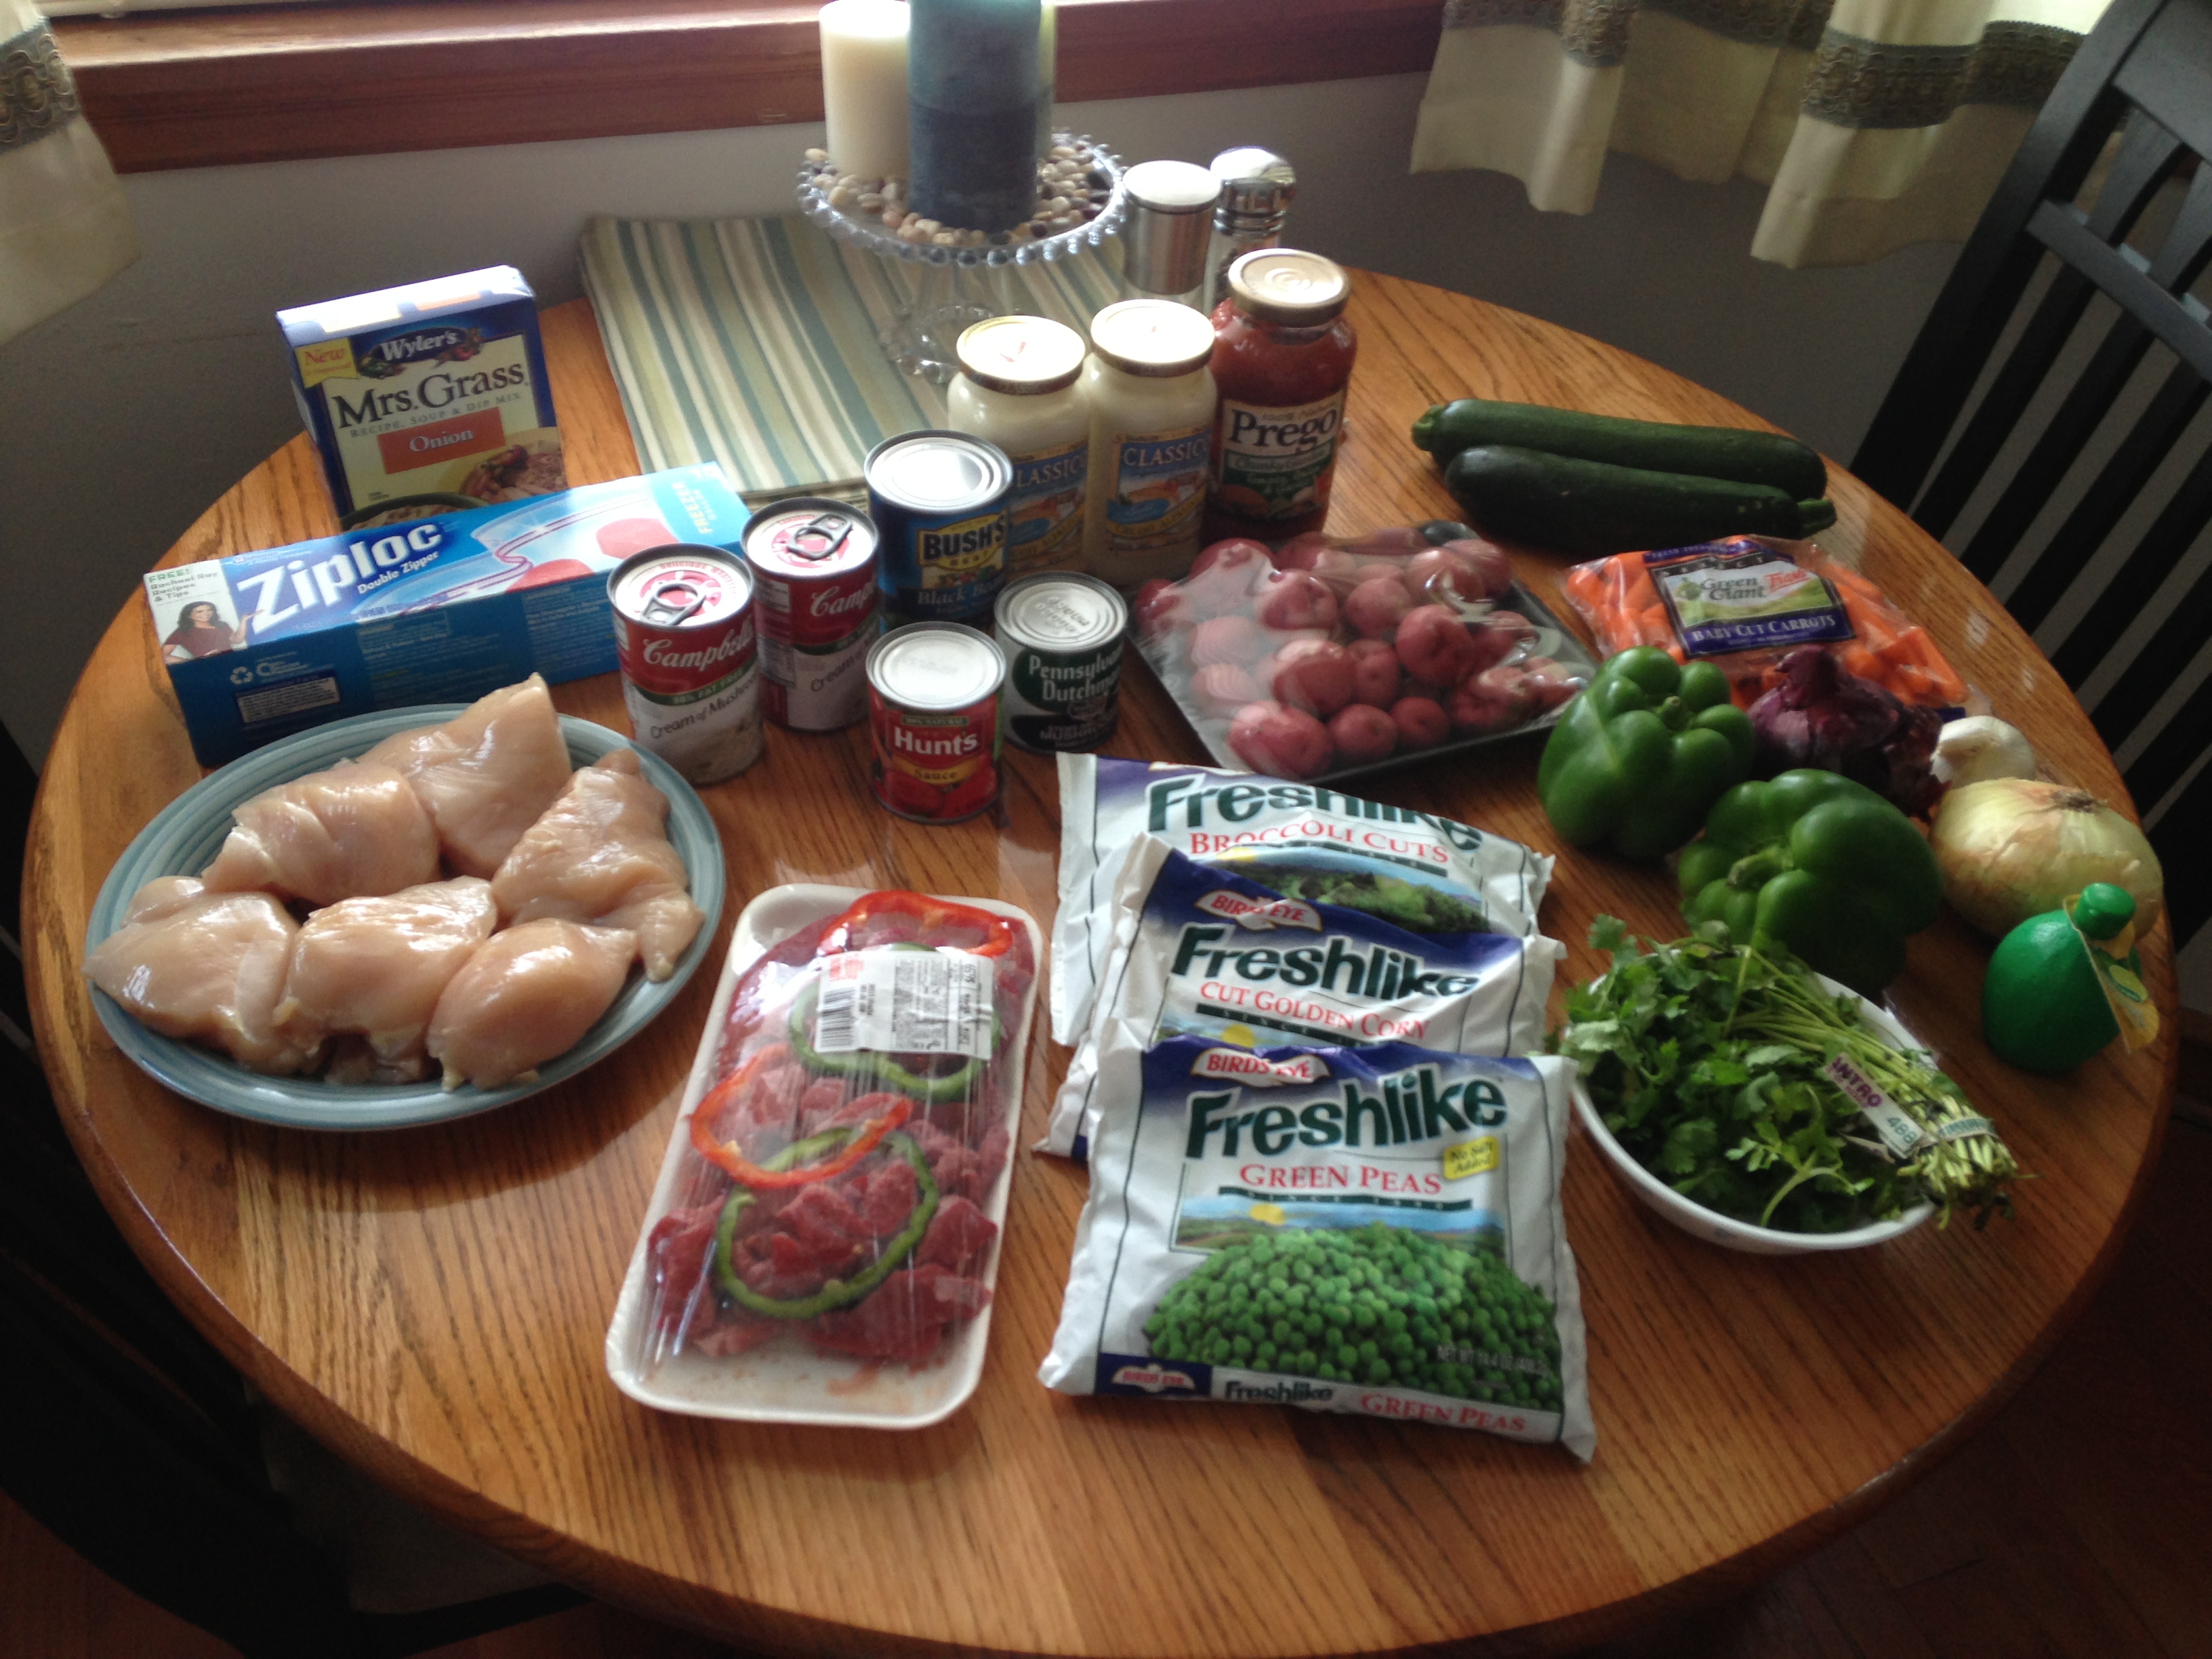
In preparation for … (holding my breath)…. Back… To….(gulp) School….. (there, I said it), I am beginning to get things in order around the house. One of those tasks includes grocery shopping and preparing meals. Bless the Teacher-Mothers who are able to come home and cook dinner for their families; I just can’t seem to manage that, and I’m not even a mother! I decided to try frozen Slow-Cooker meals as a new option for my husband and me. I found some excellent recipes from Six Sisters’ Stuff – they really know their stuff! Very easy recipes without crazy ingredients, affordable, and delicious.
Though they have dozens of recipes, I picked 4 to begin: Cilantro Lime Chicken, Chicken Broccoli Alfredo, Hearty Beef Stew, and Chicken Cacciatori.
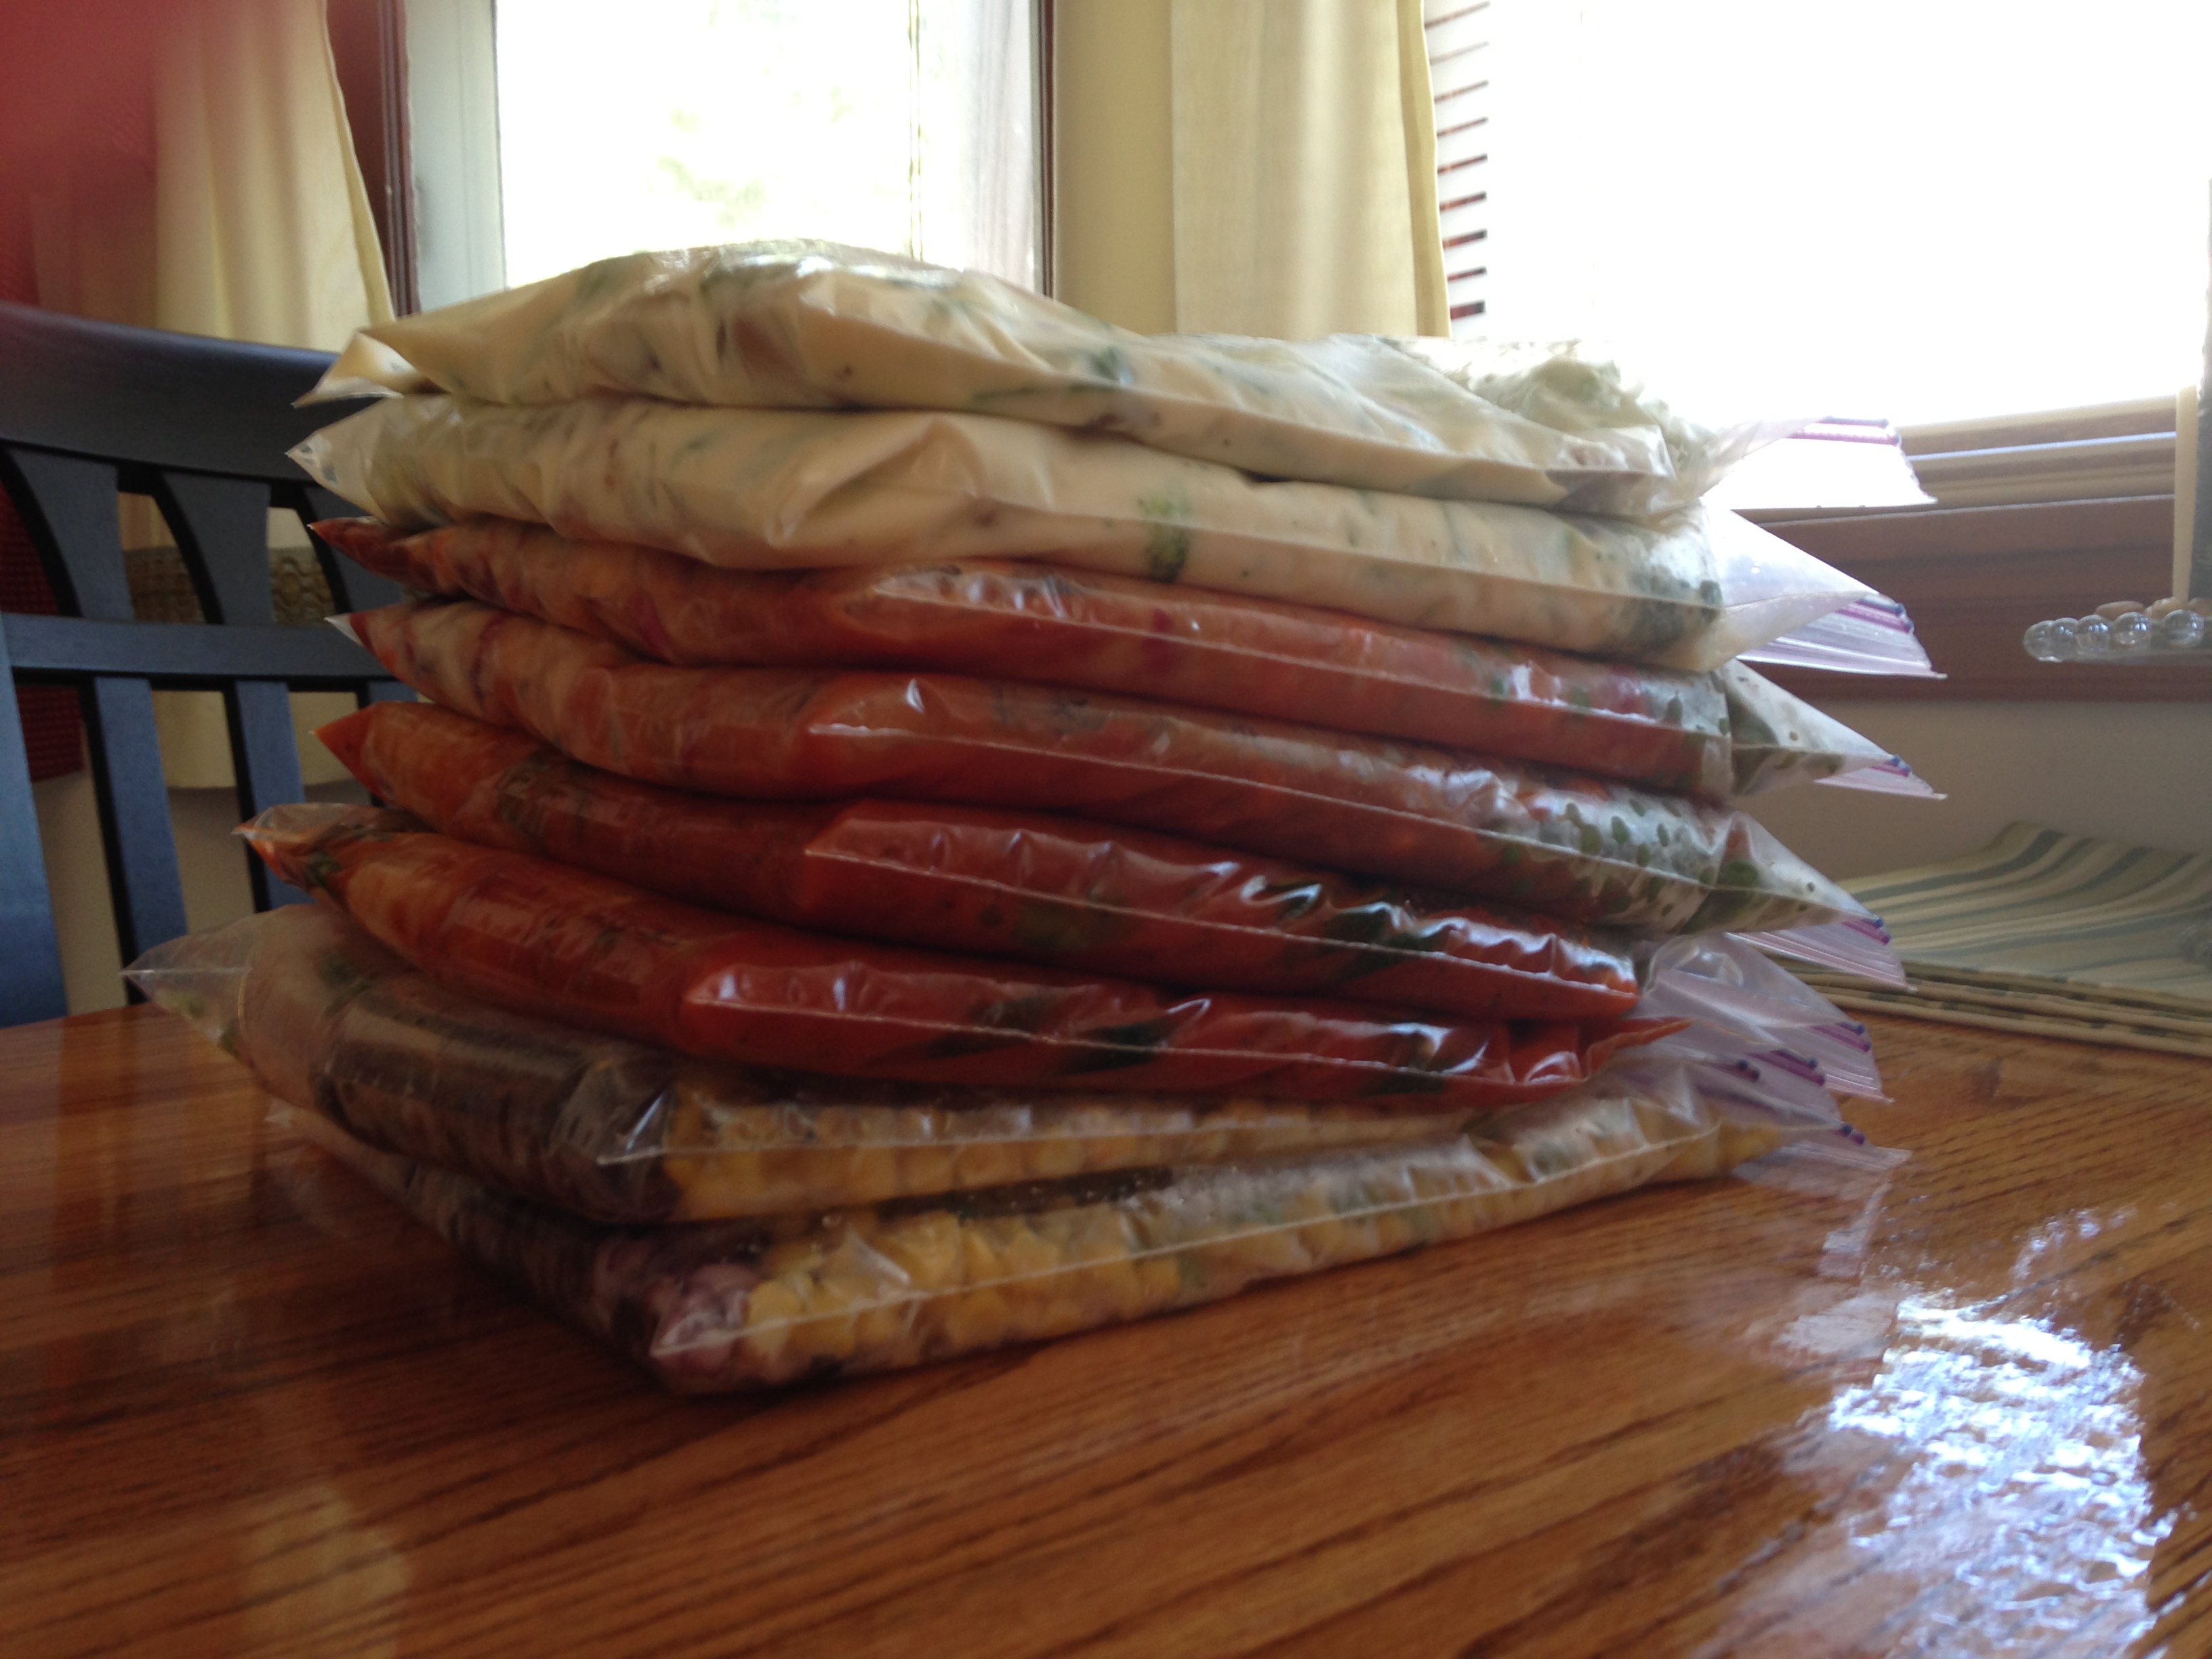
I began at the grocery store, where the above ingredients cost me only $51.63!!! Since I am making 8 Bags (16 meals), that’s only $3.22 a meal! I was very pleased with this, and I know I could have done better with coupons (new goal for next round).
The preparation took approximately 1 hour, just like the Six Sisters promise. I have a few recommendations if you are going to give this a try:
1. Begin by getting out a Sharpie and labeling all of your freezer bags. The Six Sisters recommend using freezer gallon bags. I did this, but I split each of the recipes into *2* gallon bags. They say the recipes are for approximately 5-6 meals, and it’s just my husband and myself, so I figured why not make it even easier by dividing in half.
2. Prepare all of the meat first. I hate this part and I like to get it over with. I clean and trim all of the meat and separate it into the appropriate bags. Then I can clean my countertops and not worry about cross-contamination.
3. Flip out the zippers of the bag. This makes the bags stand up nicely, and they are open for dumping in ingredients. You probably knew this already 😉
4. Use this as an opportunity to clean out your fridge/freezer! I love vegetables, so I added WAY more than the recipes called for. I cleaned out my veggie drawer and any little bags of frozen veggies I had left over from other meals.
5. Save the frozen ingredients for last.
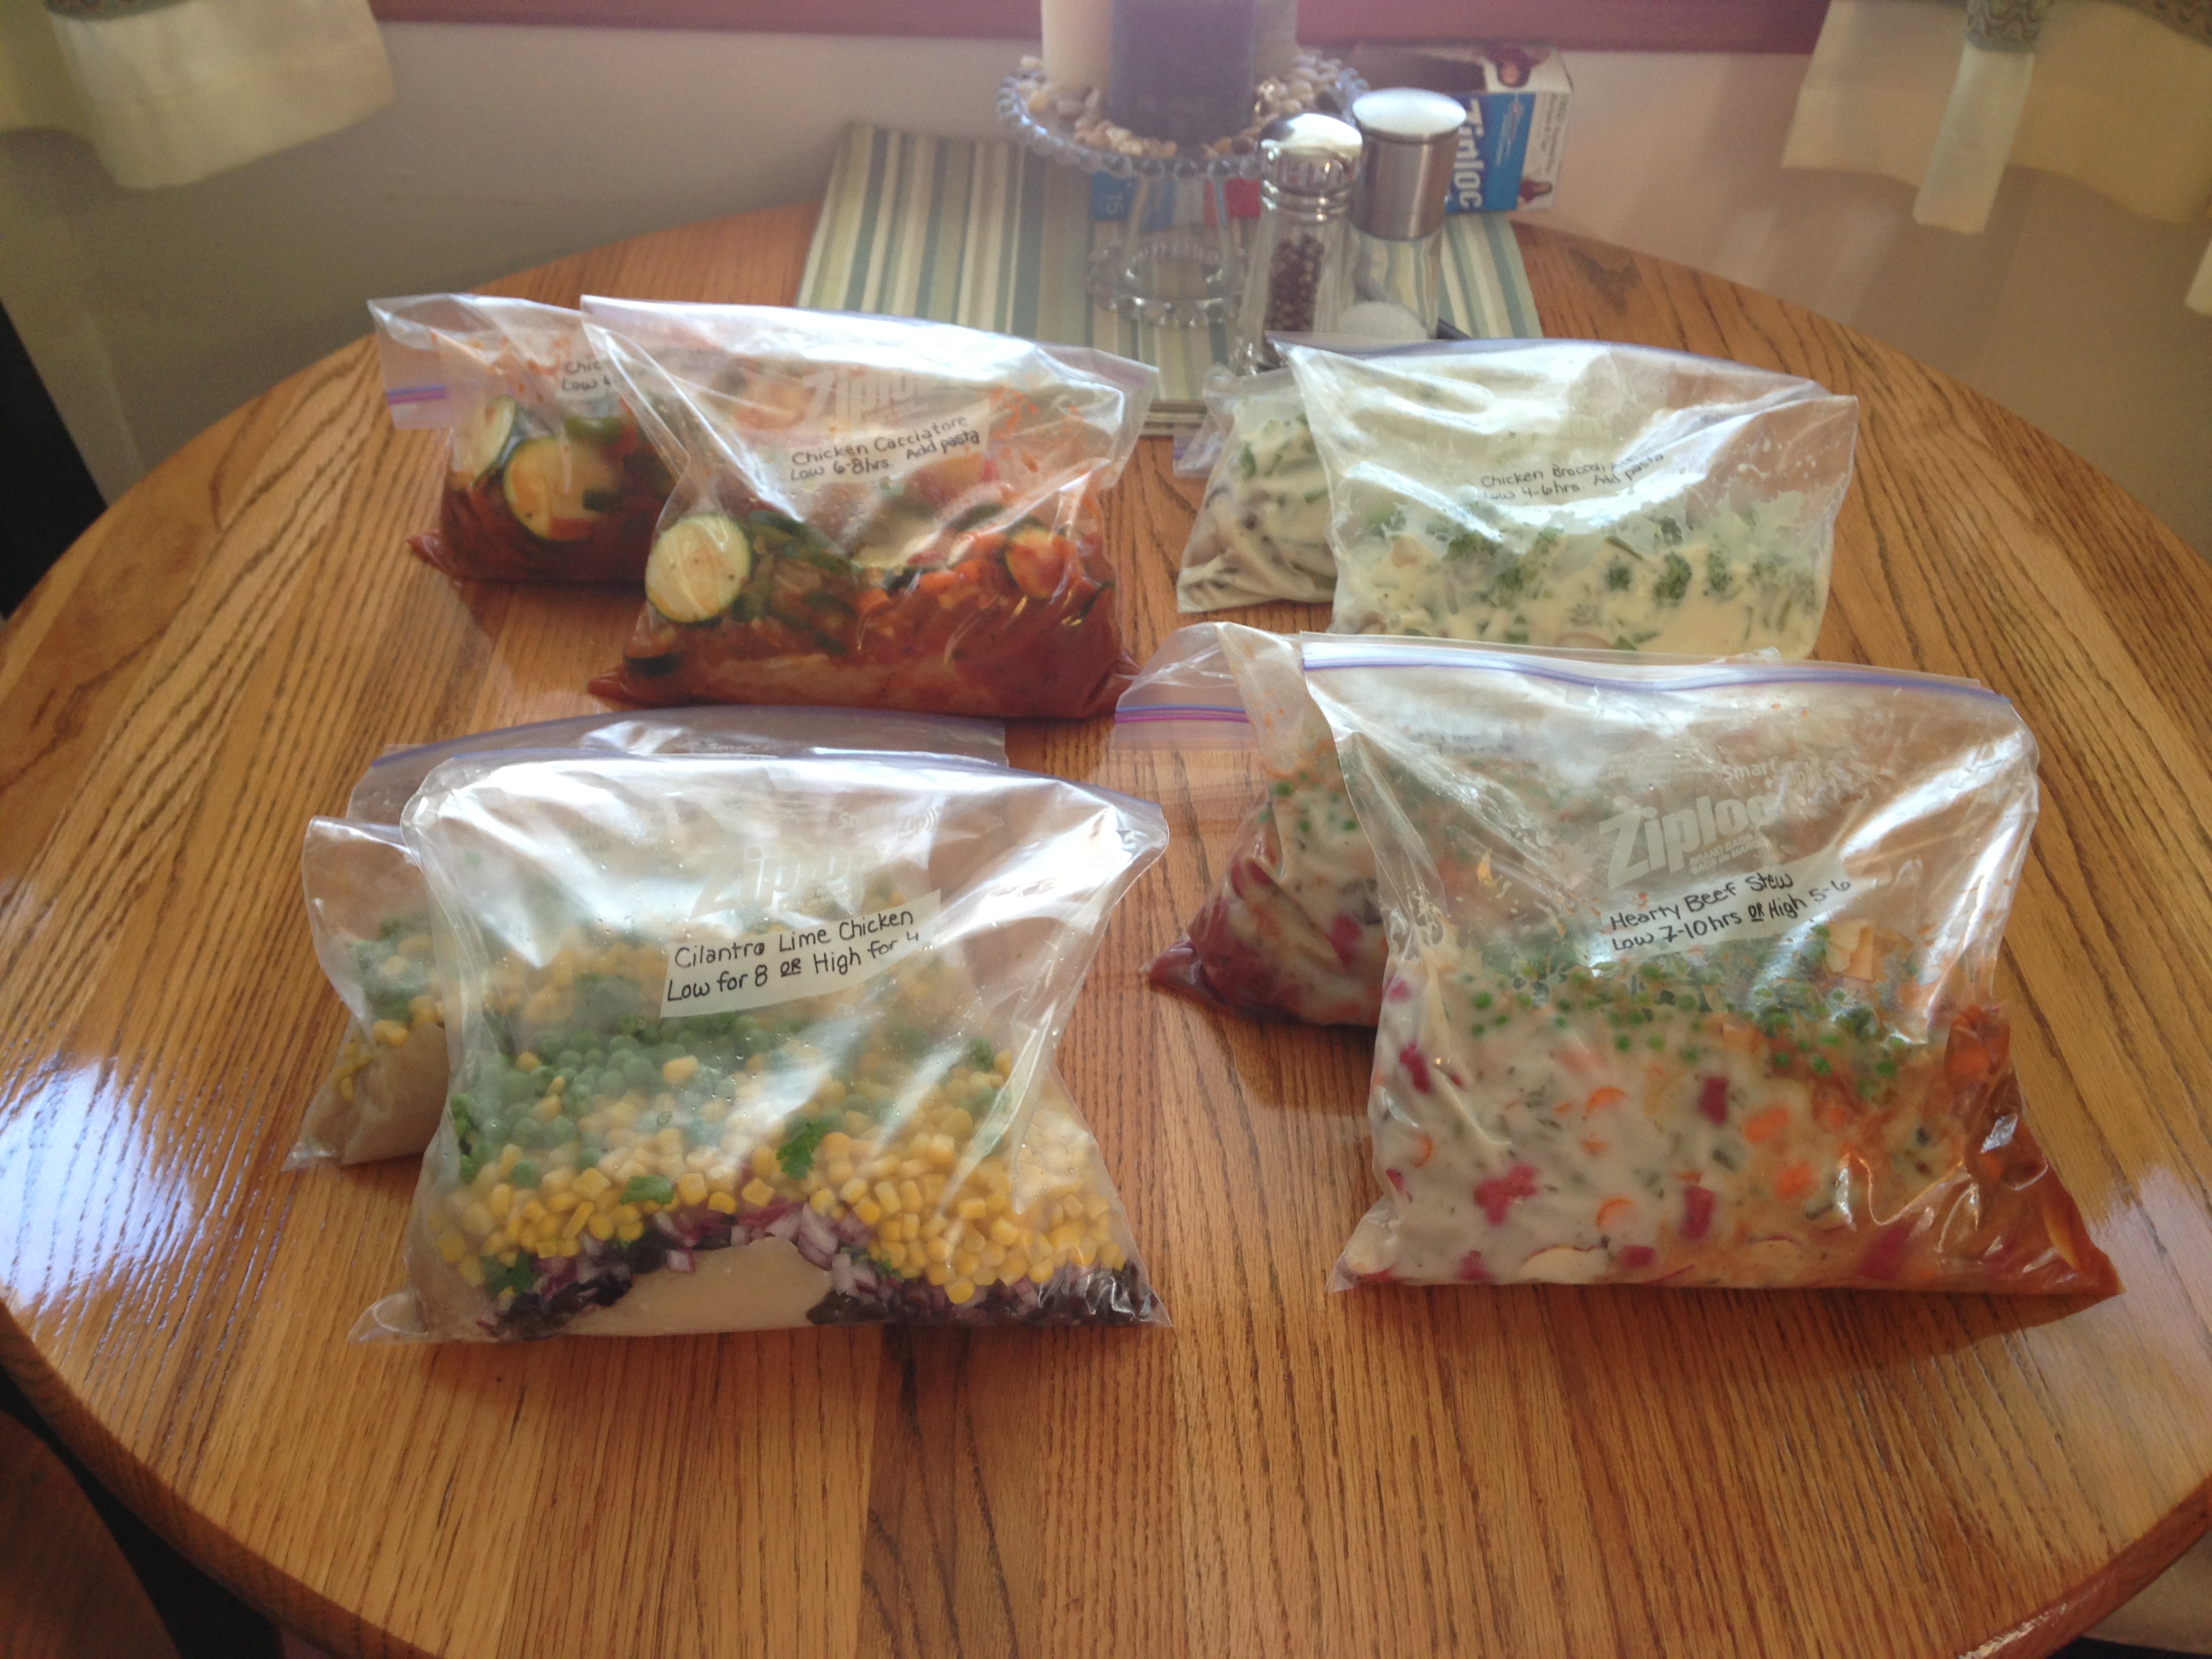
Here are the final products – 8 frozen meals for 2-3. The directions are right on the bag: they’re ‘Husband-Proof’!
And here they are all stacked up, waiting to go in the freezer. They take up about a third of my freezer space.
A tip I have heard is to use Slow-Cooker liners to speed up the clean-up process. I don’t feel good about cooking my food in plastic bags, so I will not be doing this.
I hope these meals will last us through the crazy first month of September. The investment (financial and time) are definitely worth it!
I have an idea that I am excited to try out this fall. Recently, I learned about two new apps that I think will be very valuable in my classroom. Both of them offer a virtual reality experience of sorts. I think this will be ideal for students who need a break from ‘reality.’
Teachers – you know when you have a student who just seems like they need to take a deep breath and start fresh? Perhaps they are overwhelmed, emotional, or anxious. This is when I would invite them to take out their iPad (or borrow mine) and have a 3 minute Virtual Reality escape. This will replace my old ‘go to’ techniques of “Why don’t you go get a quick drink?” or “Please take this (meaningless) super important document to the office for me (so you can calm down and walk it off).” These apps will hopefully occupy their mind and offer them a brief respite from what is leading them to be off task and unfocused (notice I didn’t say ‘naughty?’).
So here are the apps I am thinking of using for Virtual Reality Escape in the classroom. Let me know if you have heard of any others I can add to my list!
This app is FREE and totally awesome. You can take yourself to some amazing places throughout the world from world famous cathedrals to tropical vacation destinations. As you twist and turn your iPad/iPhone, you get a 360 degree panoramic view of the location – even the sky and ground. I must look like a real fool as I swivel in my chair and contort my body to see every inch of the awe-inspiring views, but I just don’t care! I love looking at Sphere just before bed so I can dream of a vacation.
Of course, there are academic purposes for this app as well. Perhaps there are some locations you are currently studying in the classroom, and your students would love to visit in 3D! My only complaint about this app is that not all of the links work for me all of the time. Hoping some bug fixes are on their way!
2. Sky Guide: View Stars Night or Day – by Fifth Star Labs LLC $1.99
This app was gifted to me, but normally costs $1.99. I honestly had no idea how much I would enjoy it. Basically, the app helps you to identify celestial objects (stars, planets, constellations, etc.). You simply point your iPad/iPhone at the sky, and voila! The app includes ethereal music to accompany your ‘Out of this World’ experience, but I often turn off this feature. As the title says, this works in the daytime, too. Students can imagine launching themselves into the atmosphere, flying through space, across the universe!
Of course there are real academic uses here as well – be sure to share with your school’s Science department!
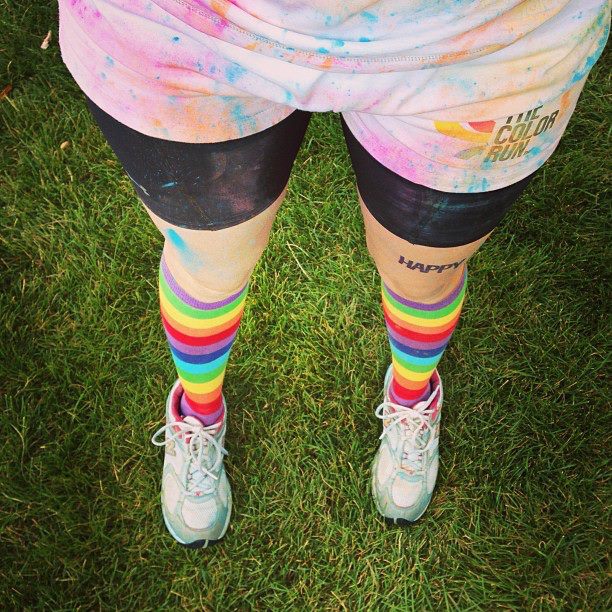
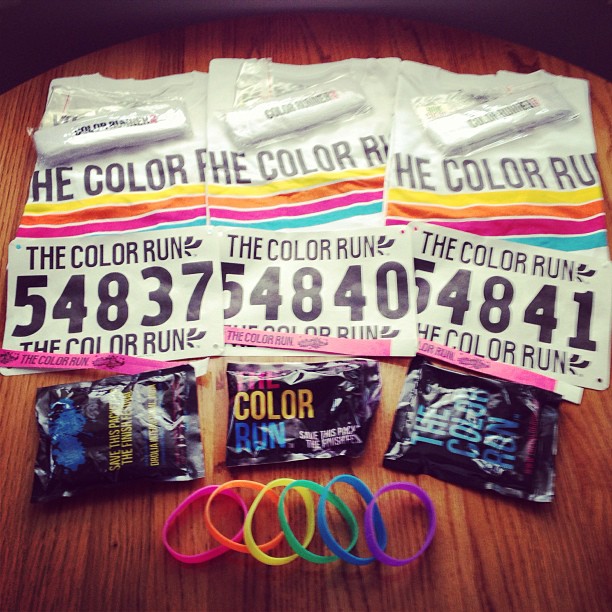
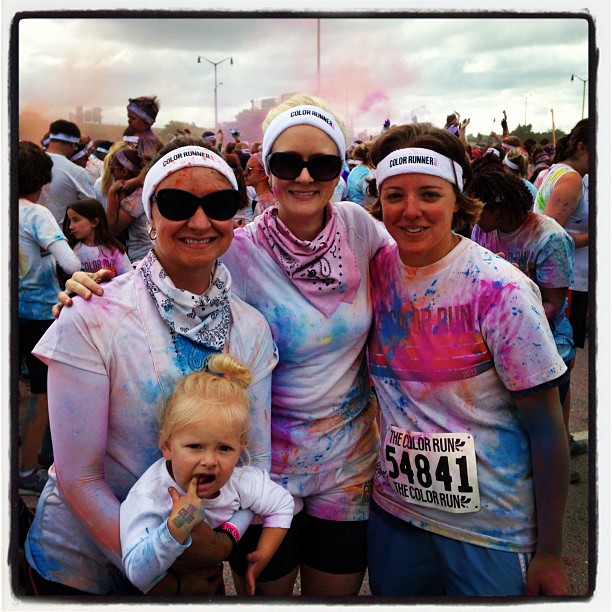
Have you ever had a chance to do a Color Run? If not, you are missing out! I had a great time and I got in a good workout 🙂
I benefitted from following some great tips from friends:
1. Wear clothes you won’t mind possibly throwing away. All of my clothes came clean, but my headband and towel still look a mess. I soaked them in Oxyclean, then ran them through the washer with bleach several times, but they are still blue hued. Oh well!)
2. Bring eye protection and a bandana. I wore sunglasses and a bandana around my neck, which I pulled up around my mouth and nose while going through color stations.
3. Leave everything else in the car. Seriously – empty your pockets.
I loved that I ran a 5K and it didn’t really feel like it. There is so much fun to distract you from the … well… tediousness of running. You see the next color station coming up, hear the excitement, and you forget that you are running at all! The party at the end was a good time, too. Think giant outdoor Zumba class with people tossing color into the air while giggling in glee.
Afterward, I went straight home and shook off before walking inside. Then I dumped everything straight in the wash and got myself into a well-deserved warm shower. I was shocked to find color on the strangest places on my body – places I had fully covered with multiple layers of clothing. I was fortunate not to have any in my hair which, as you may have seen, is as blonde as it gets. It would have been days until the color washed out!
I would definitely recommend the Color Run for anyone looking for a challenge and a fun experience. My husband and I have already signed up for the Electric Run in September. What an innovative way to stay motivated and healthy!
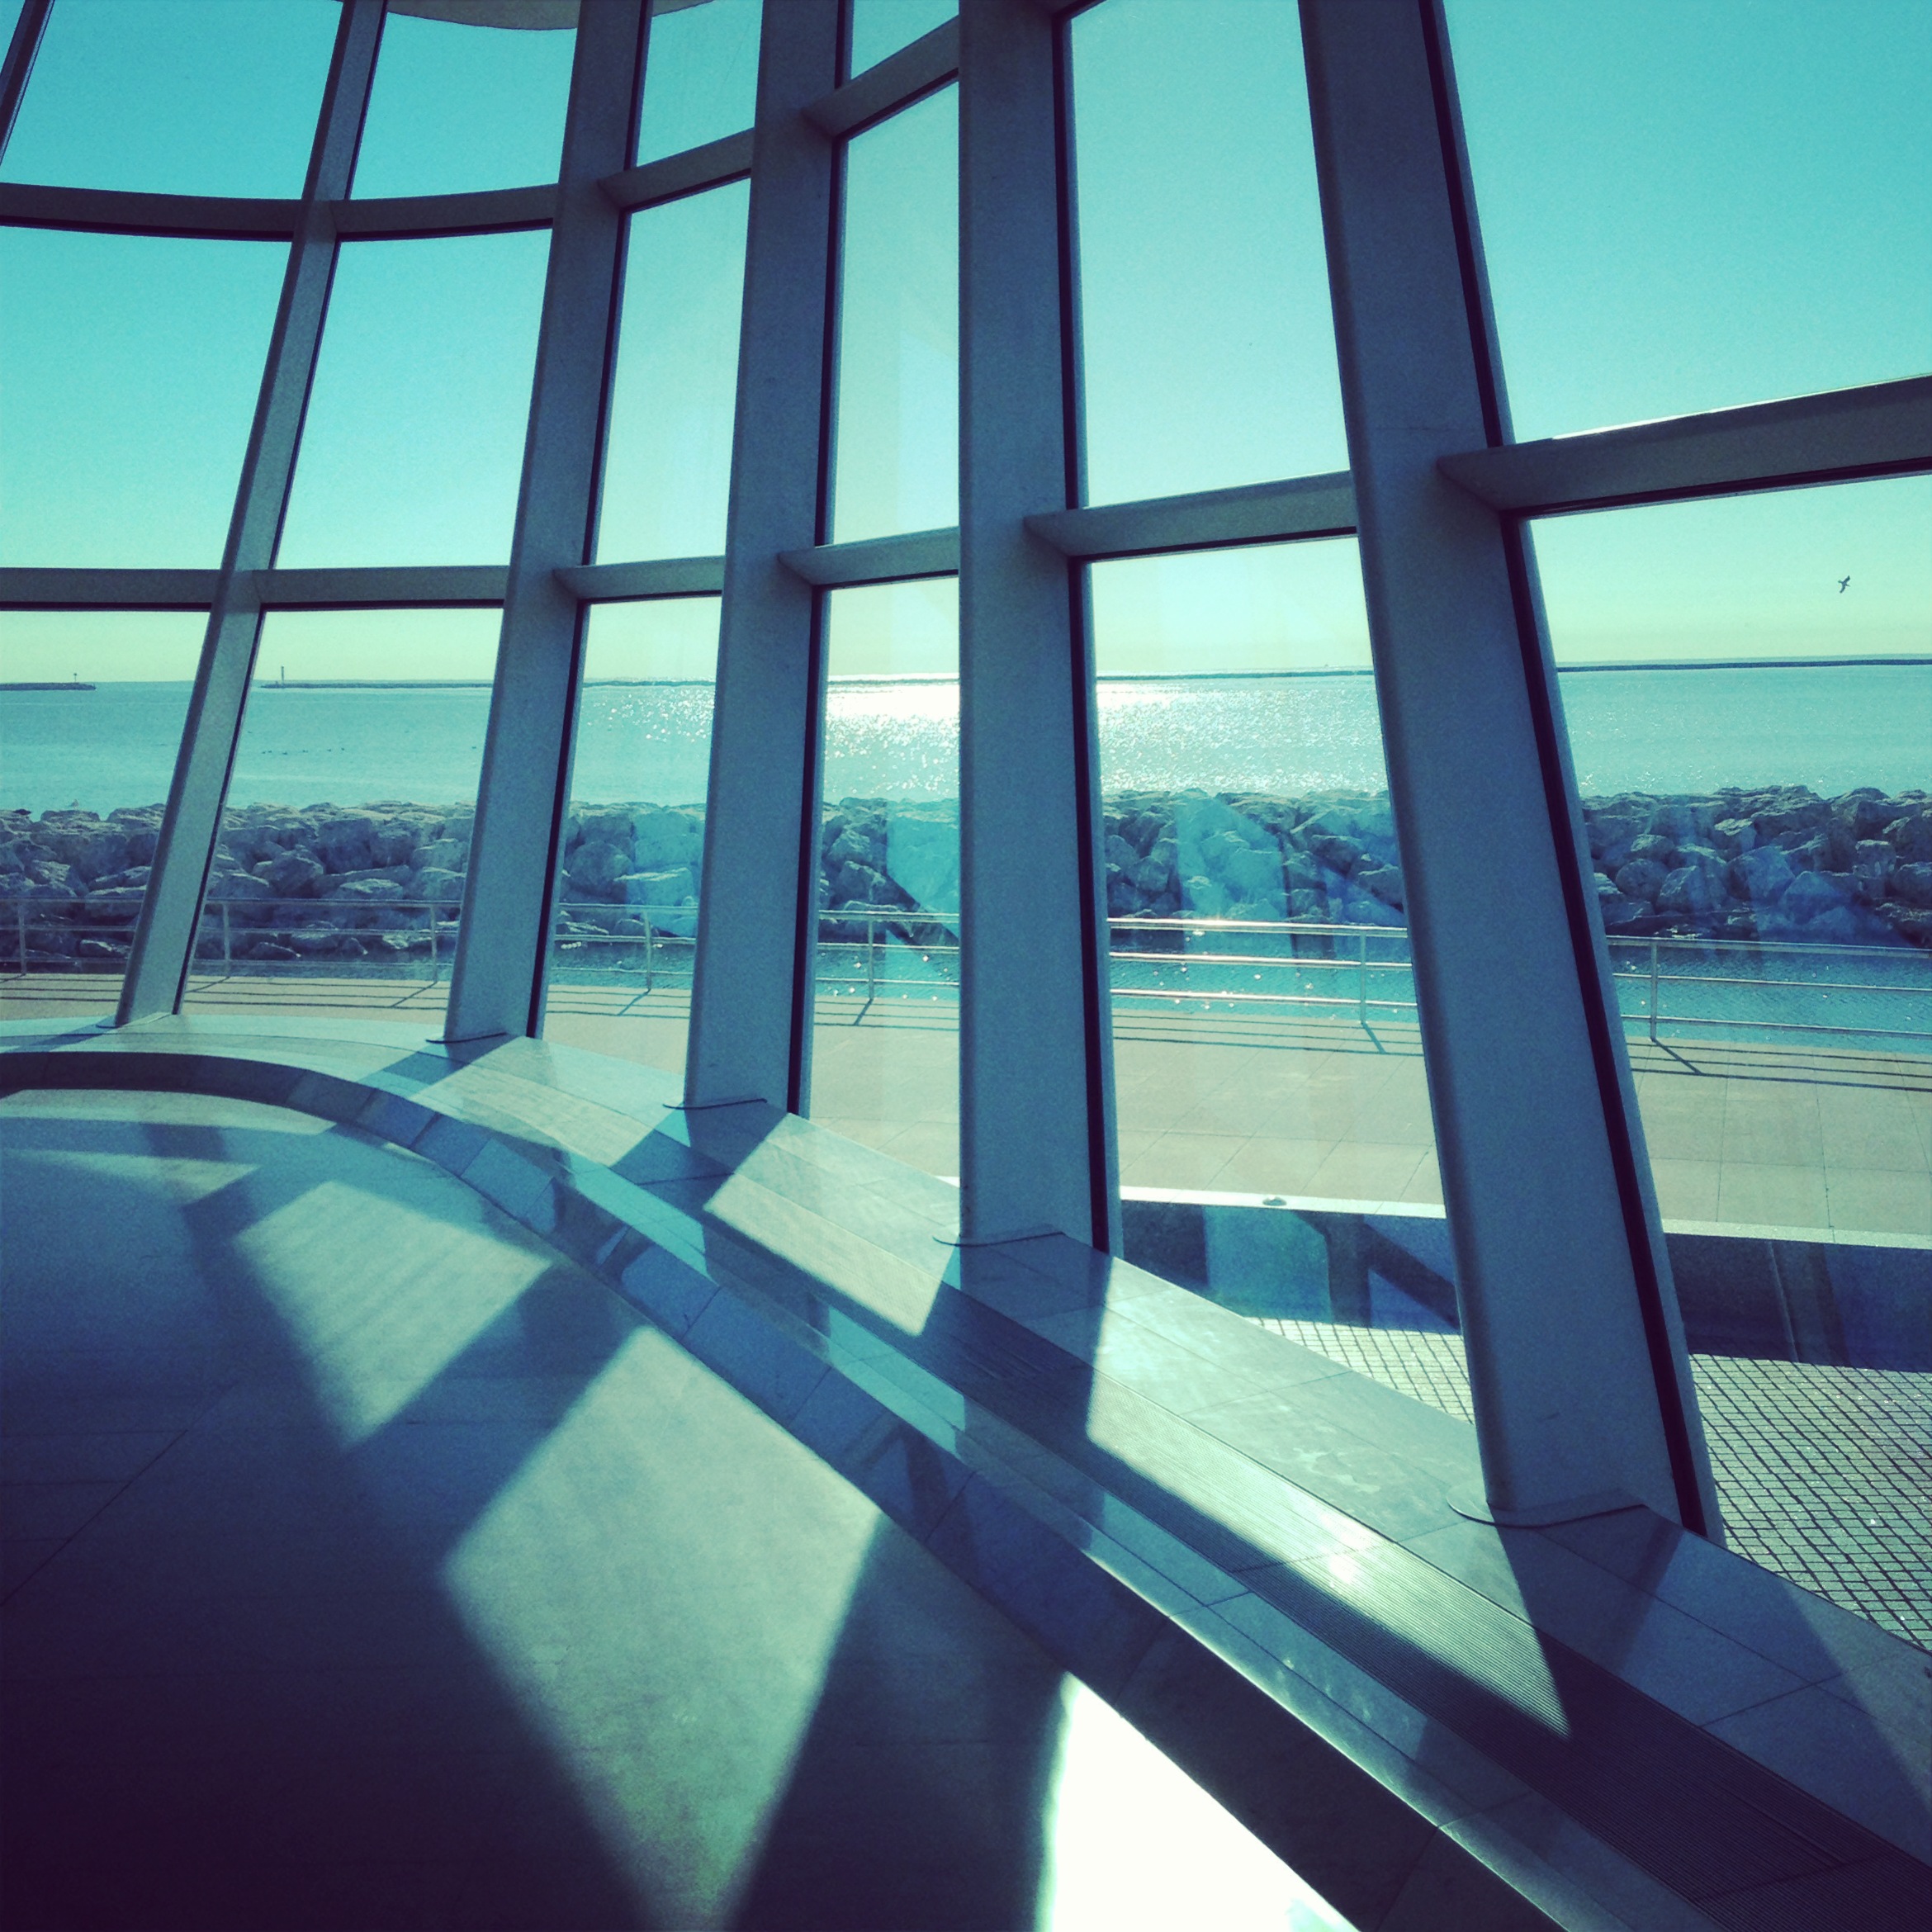
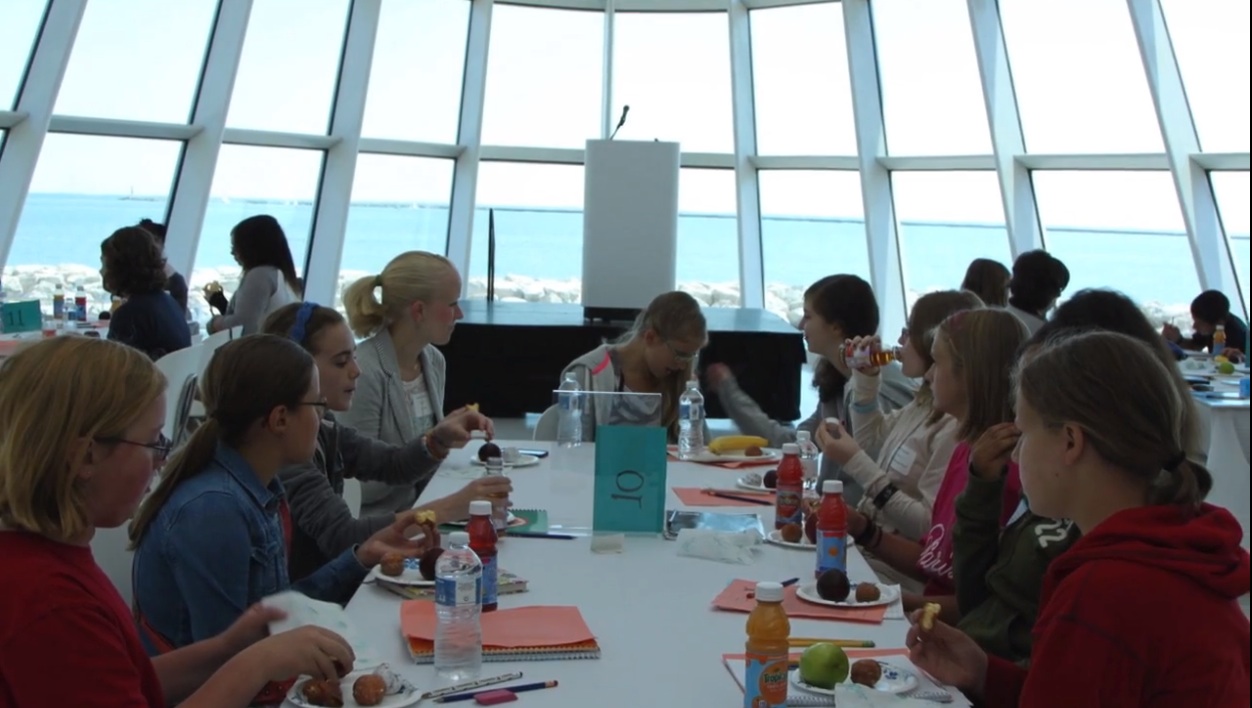
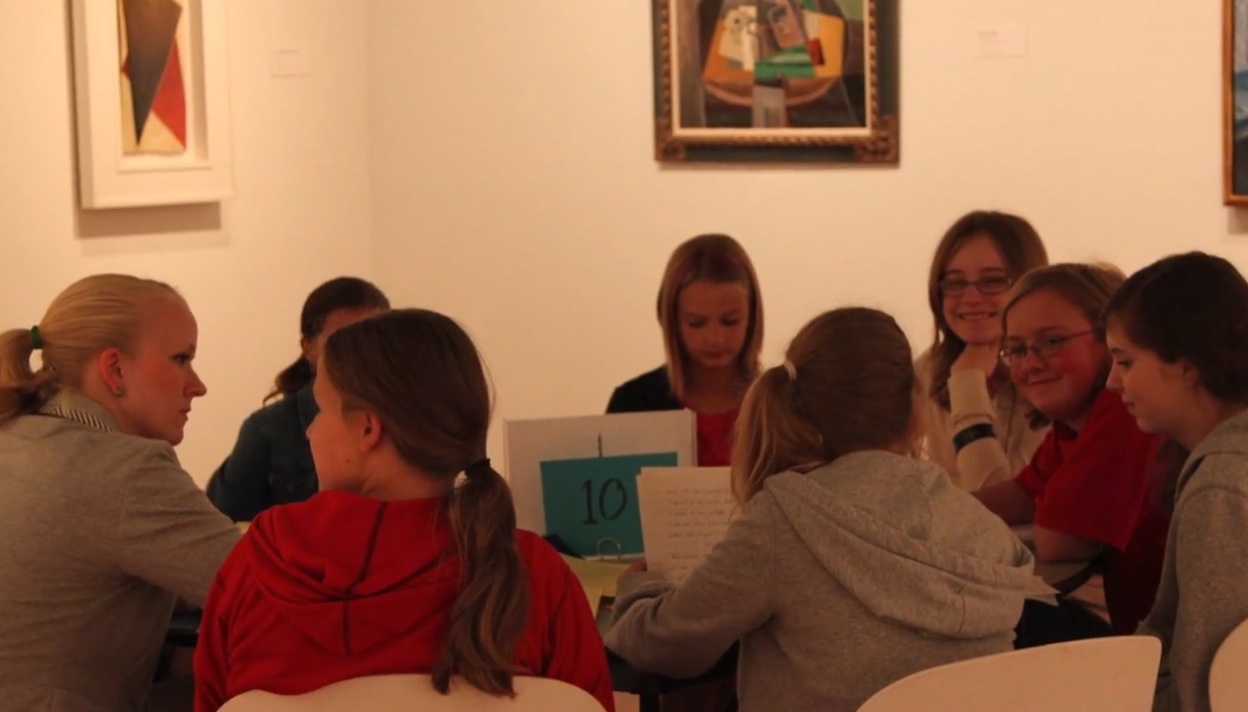
Last week, I was honored to participate in my 4th Art of Writing Conference. It is a truly amazing experience where young authors (and artists) from across the state meet at the Milwaukee Art Museum for a day of exploration and writing.
We begin the day by breaking up into small groups (I get the 7th and 8th graders, sweet!) and tour the MAM. We are allotted an hour to wander and reflect on the art. I usually have a group of about 10 students, so I let each student take a turn being the ‘leader,’ the lucky duck who gets to choose the piece of art we discuss next. They love leading us all over the museum. Our goal is to discuss the artist’s message while also looking for a way to connect personally to the piece. This is definitely my favorite part of the day. You would not believe what these young, promising students ‘see’ in the art. They have very profound and touching things to say. I never get tired of the museum tour because each group of students sees something different – even if it’s the same piece I’ve viewed with hundreds of students before them, I always hear something new. It makes me very hopeful for the future.
Later in the afternoon (after our favorite mid-morning donut break and pizza lunch) my young authors gather for a silent hour of writing. There are also young artists present at the conference who attempt to capture the art and magic of the day through sketches. The authors generate a first draft of their writing piece, which is a 500 word personal narrative inspired by a piece of artwork we viewed in the morning. We sit at a table in the middle of the gallery – what a gift to be able to write surrounded by world treasures! After another short break, we engage in peer revision, editing, and writing a final copy. Then, voila, their work is published in a few short months! I am very grateful for this opportunity to be inspired by the art, authors, and artists. I only wish that all of my students could partake in this experience!
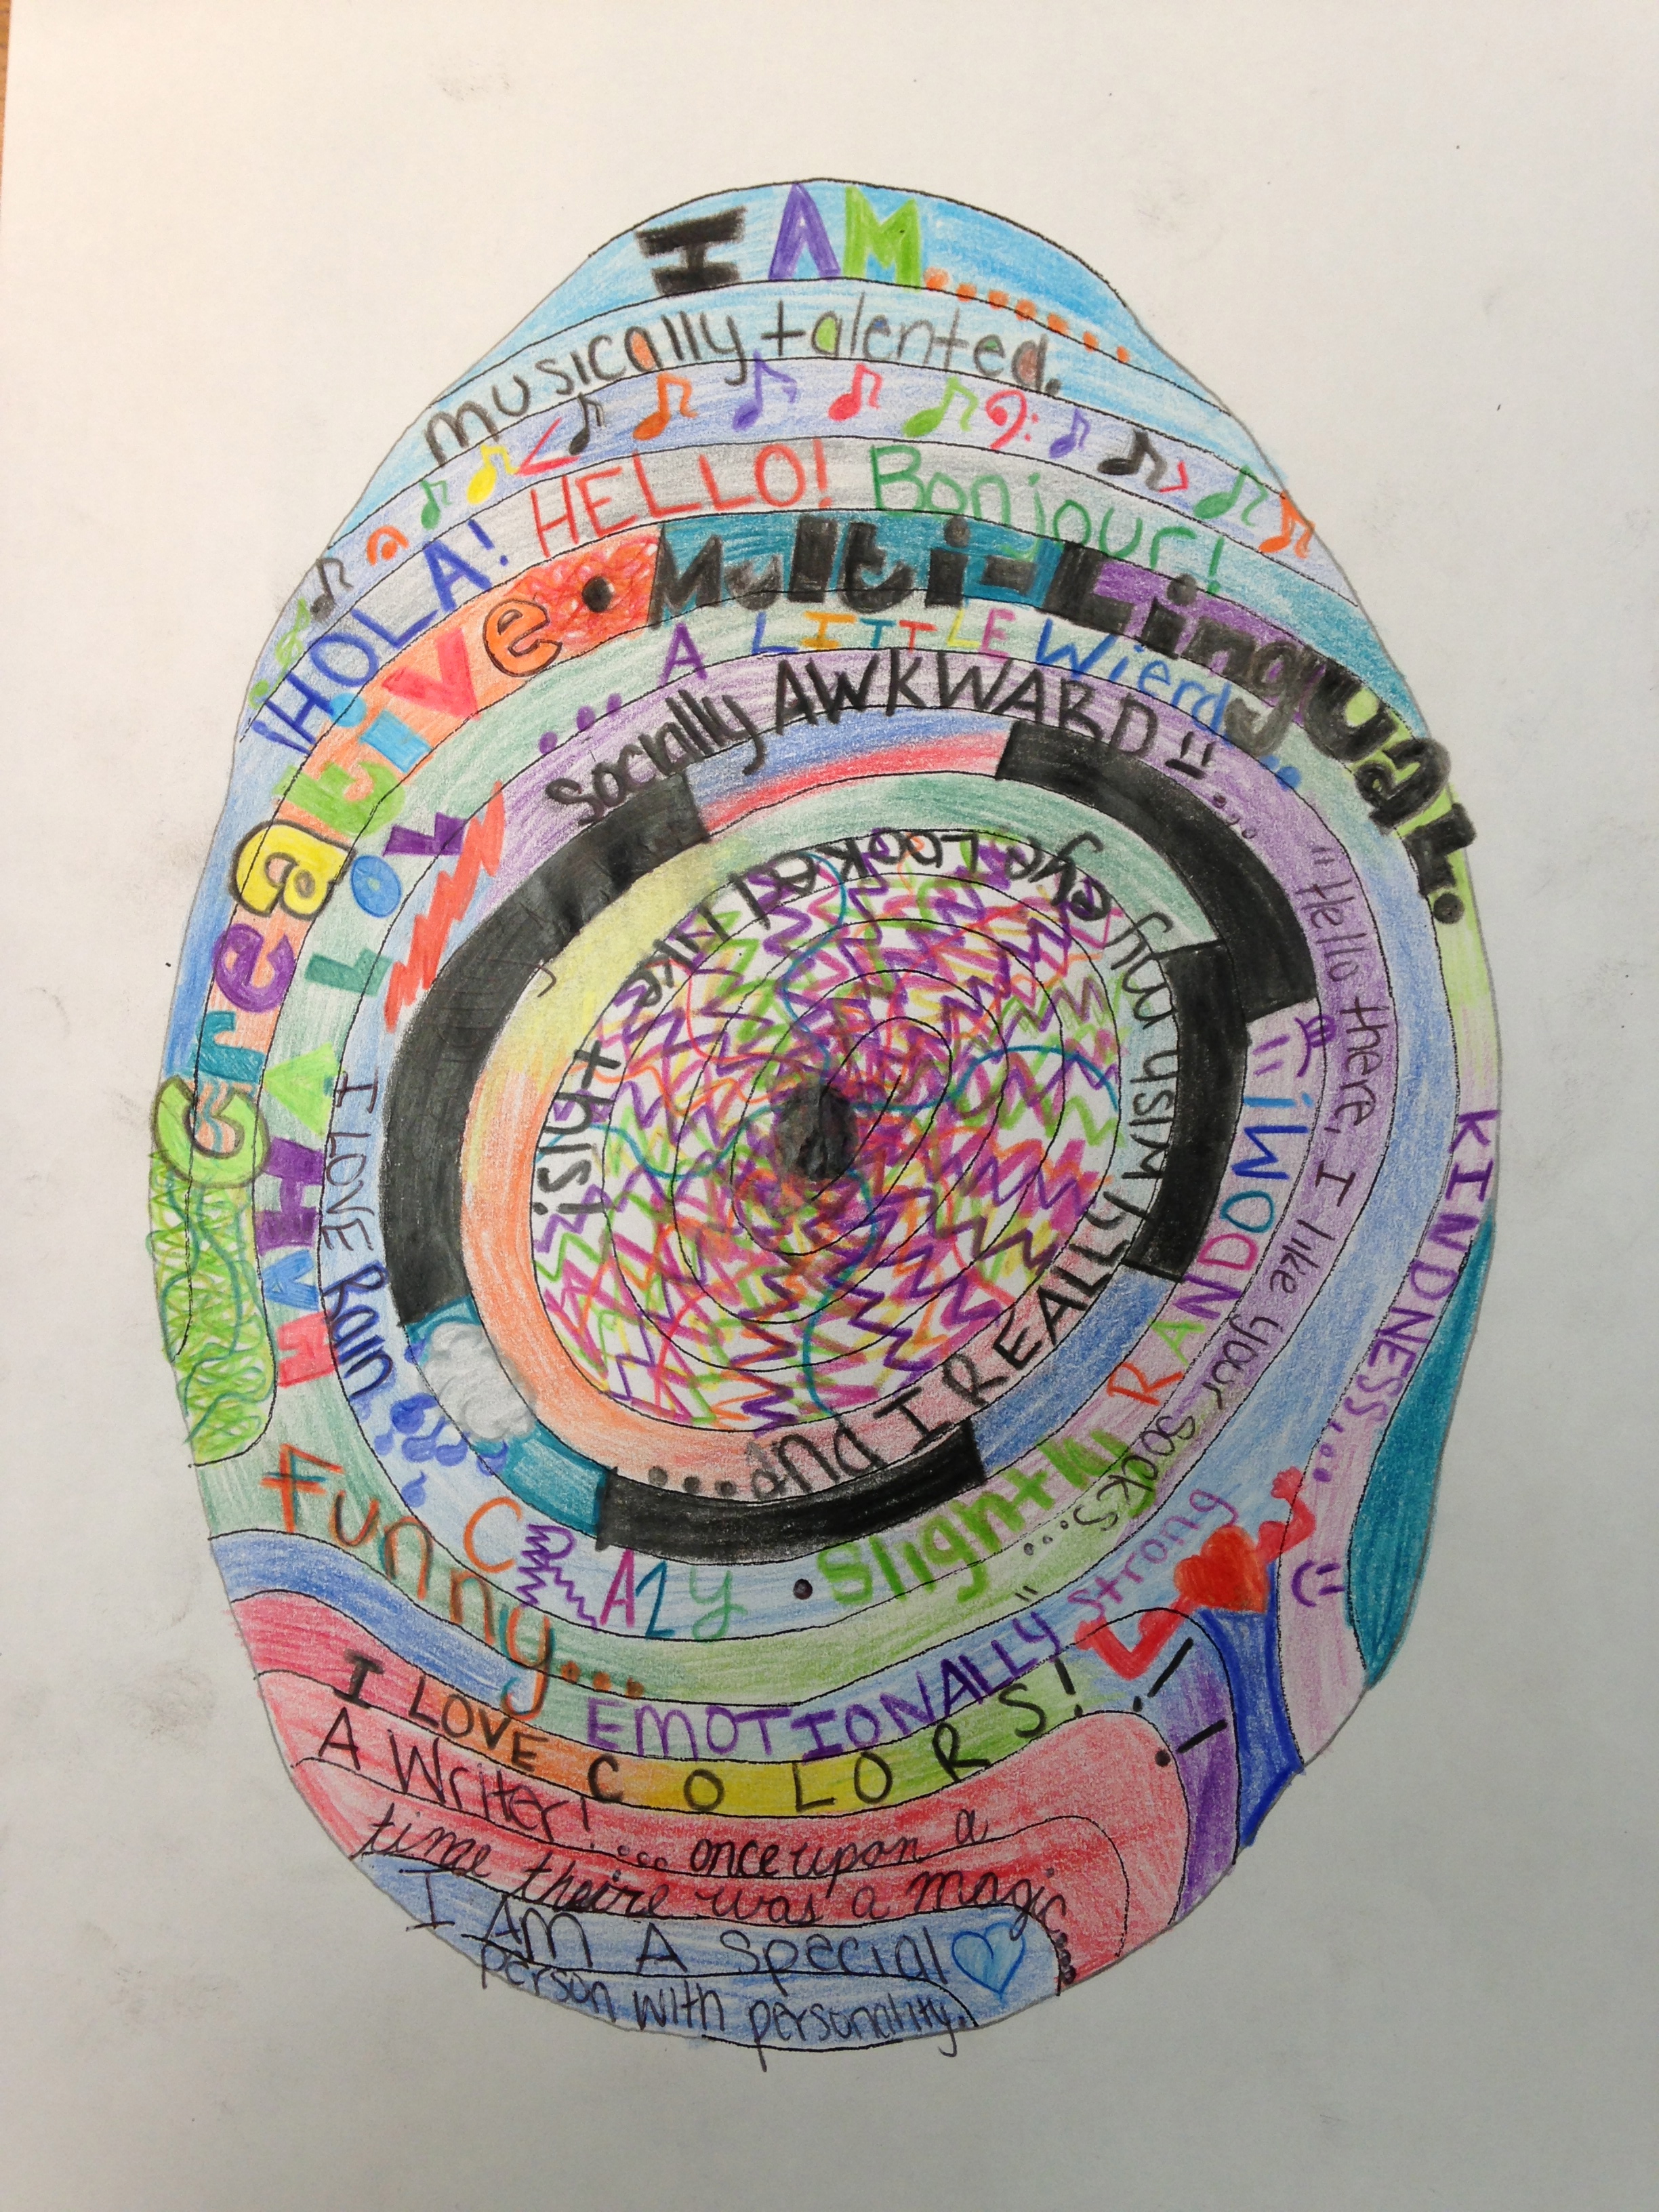
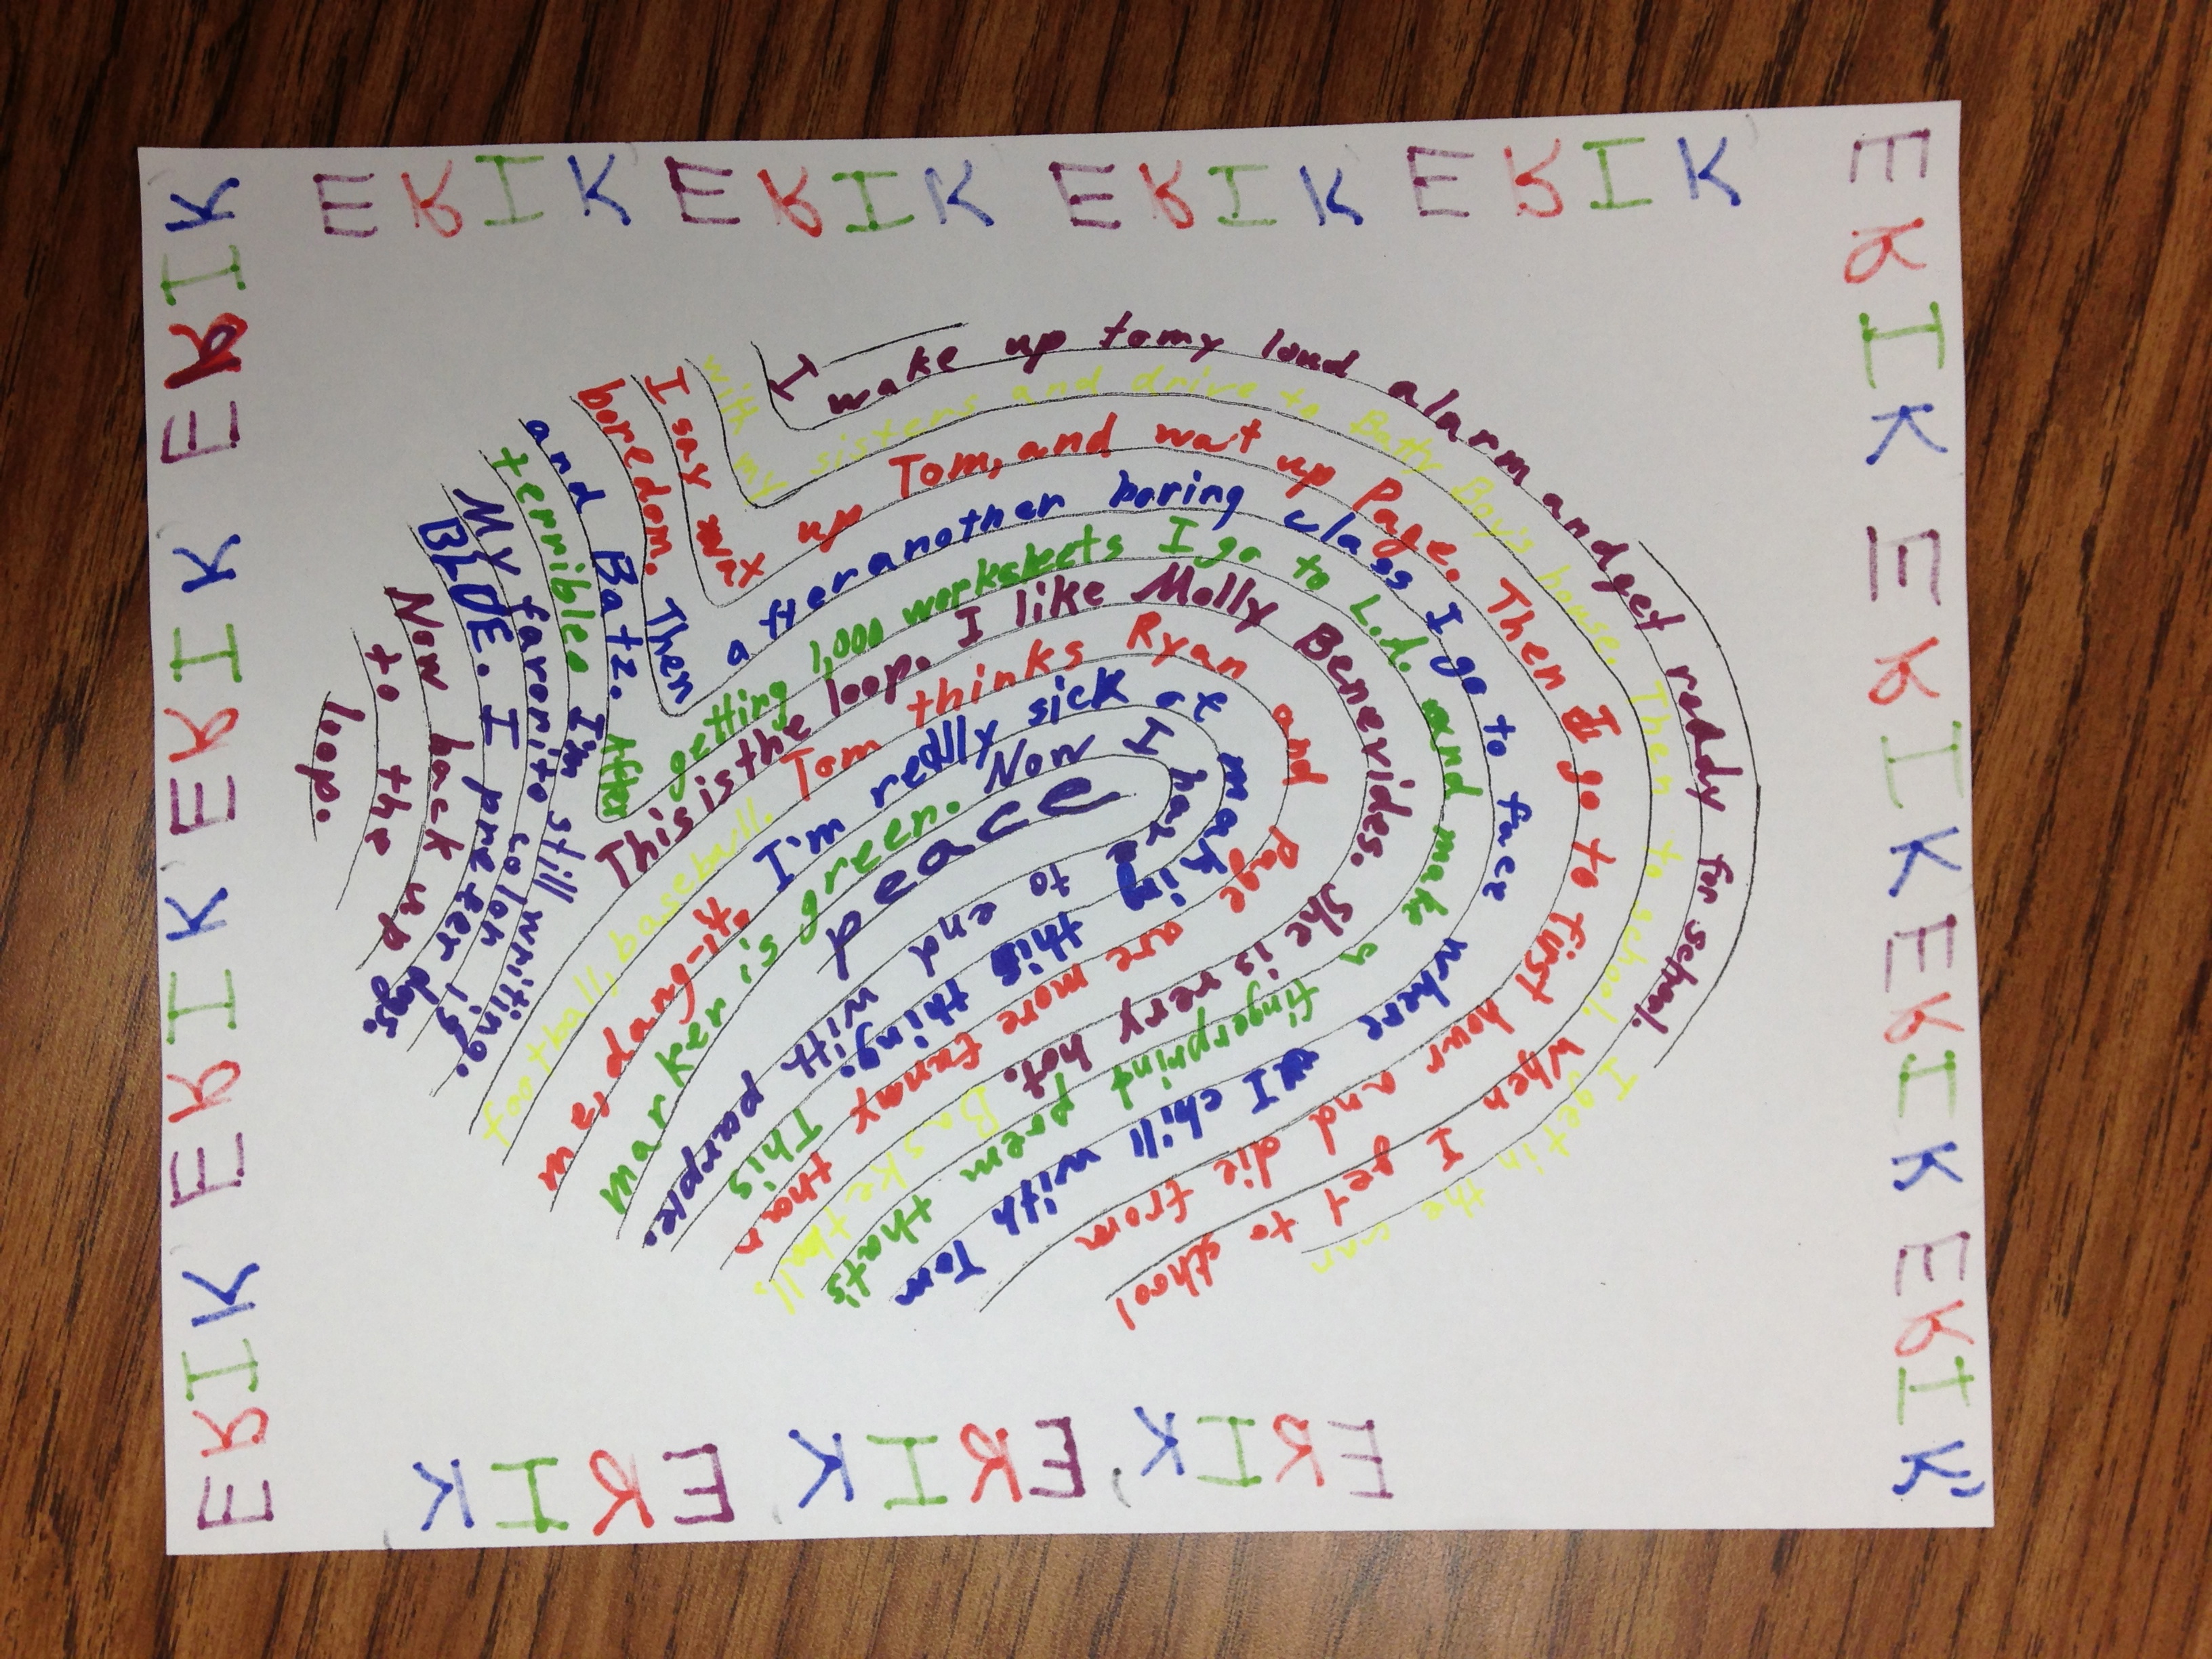
Fingerprint Poetry was an awesome way to start the year. It was an icebreaker, get-to-know-you activity, and a great transition back into writing after the summer off. Plus students get to write about their own favorite topic – themselves!
I was inspired with this idea when I noticed how my students never liked to write on straight lines. They love being artsy and letting their words flow like water. And what better way to personalize your writing than by making it on your own special fingerprint?
I first had them choose a finger and inspect it carefully. Were they a whorl? arch? loop? A lot of them had never really looked at their fingerprints up close, so they enjoyed this. .Then, they picked the fingerprint poetry template that best matched their own fingerprint.
I gave them 16 different options of what to write about, but ultimately tried to steer them towards a more ‘stream of consciousness’ type of writing or a ‘brain dump’ in which they fill the spaces with anything and everything they are thinking. It’s a very free flowing activity.
Next, I asked them to think about how they could use color, textures, and pictures to bring their fingerprint to life. They always impress me with their creativity! As you can see, the results were fantastic.
If you want to purchase this activity, which includes writing instructions and 3 fingerprint templates, click here and enjoy! Thanks!